
Flaky, Creamy Handheld Chicken Pot Pies
Golden, buttery puff pastry filled with tender chicken, creamy sauce, and hearty veggies. These handheld chicken pot pies are comfort you can carry.
Your Anytime Comfort Food Fix
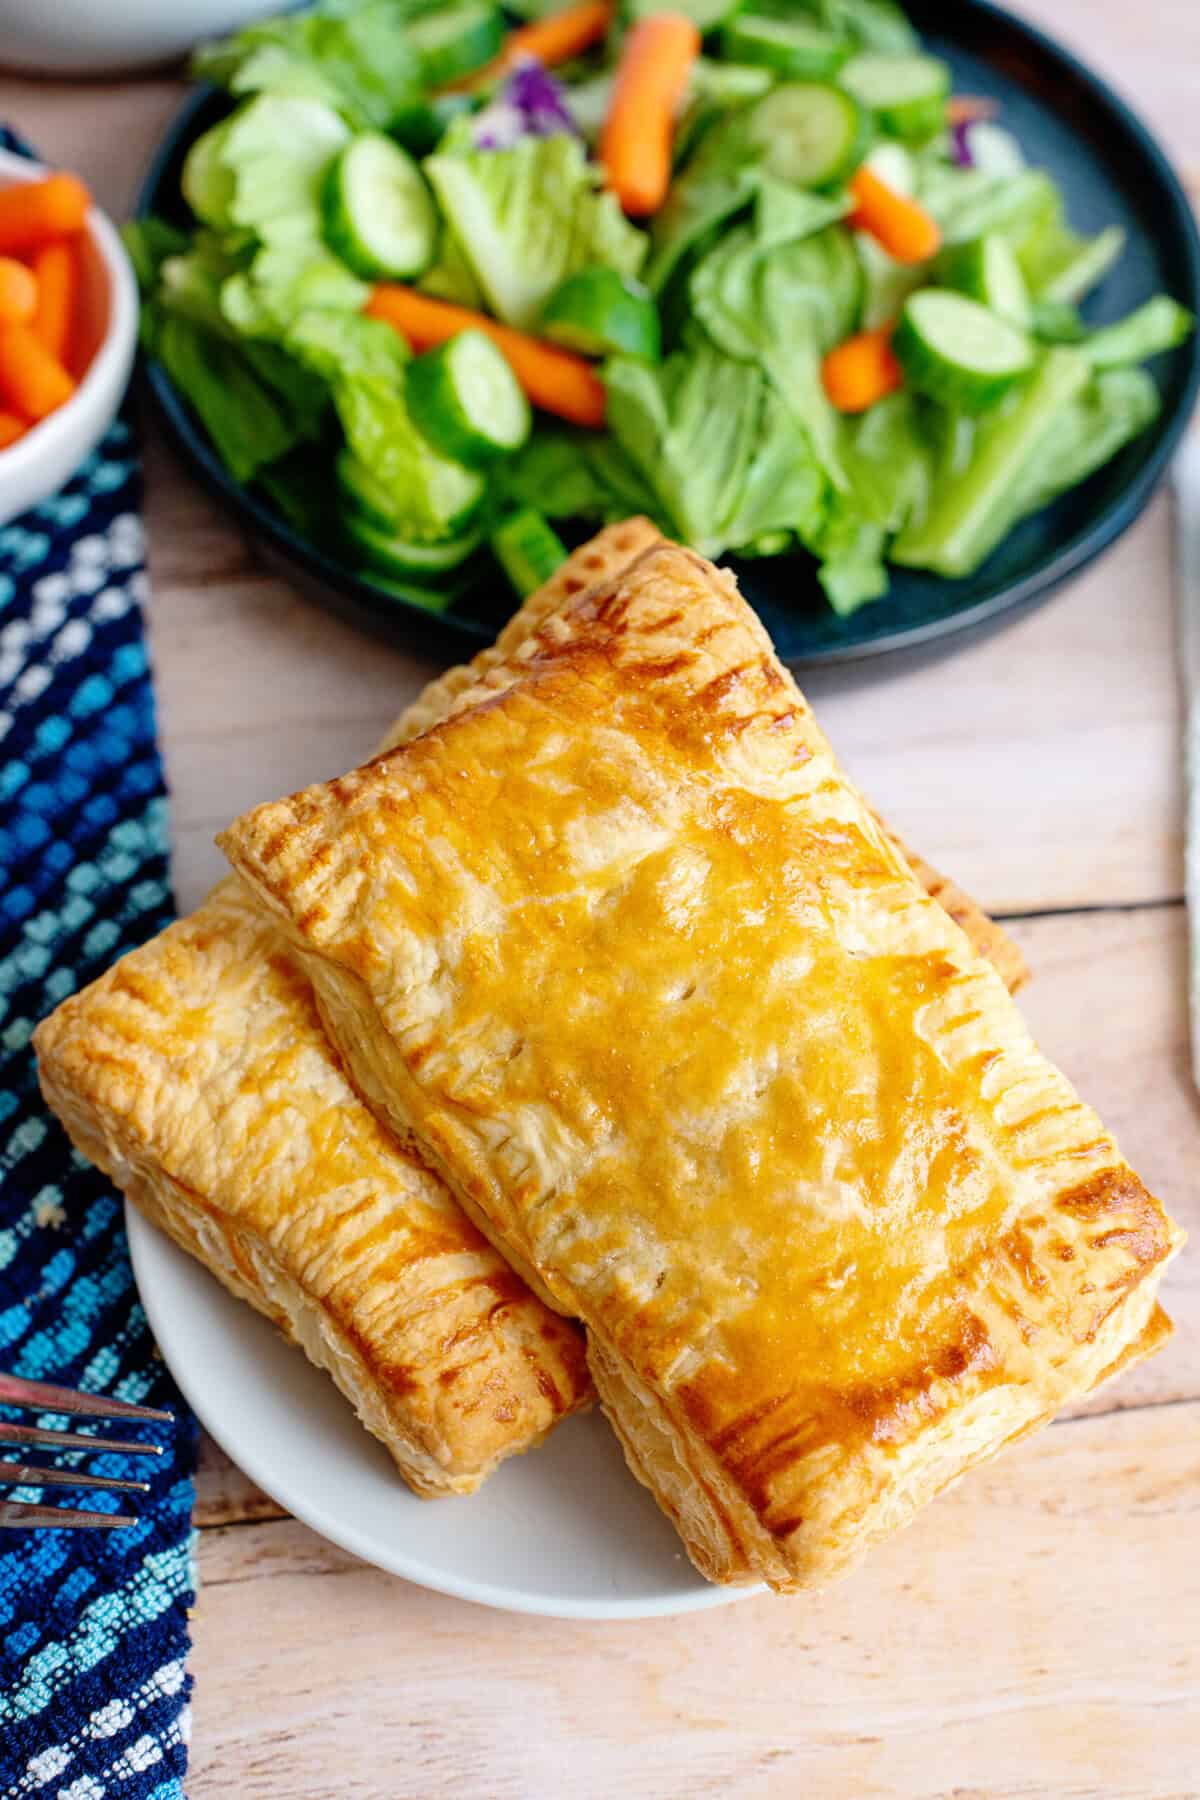
I’ll level with ya; sometimes, I really don’t want to wait on a full-sized pie to bake. Lucky for you and me, these handheld chicken pot pies have all the comfort of the classic, wrapped up in a flaky puff pastry that’s perfectly portioned and easy to grab on the go!
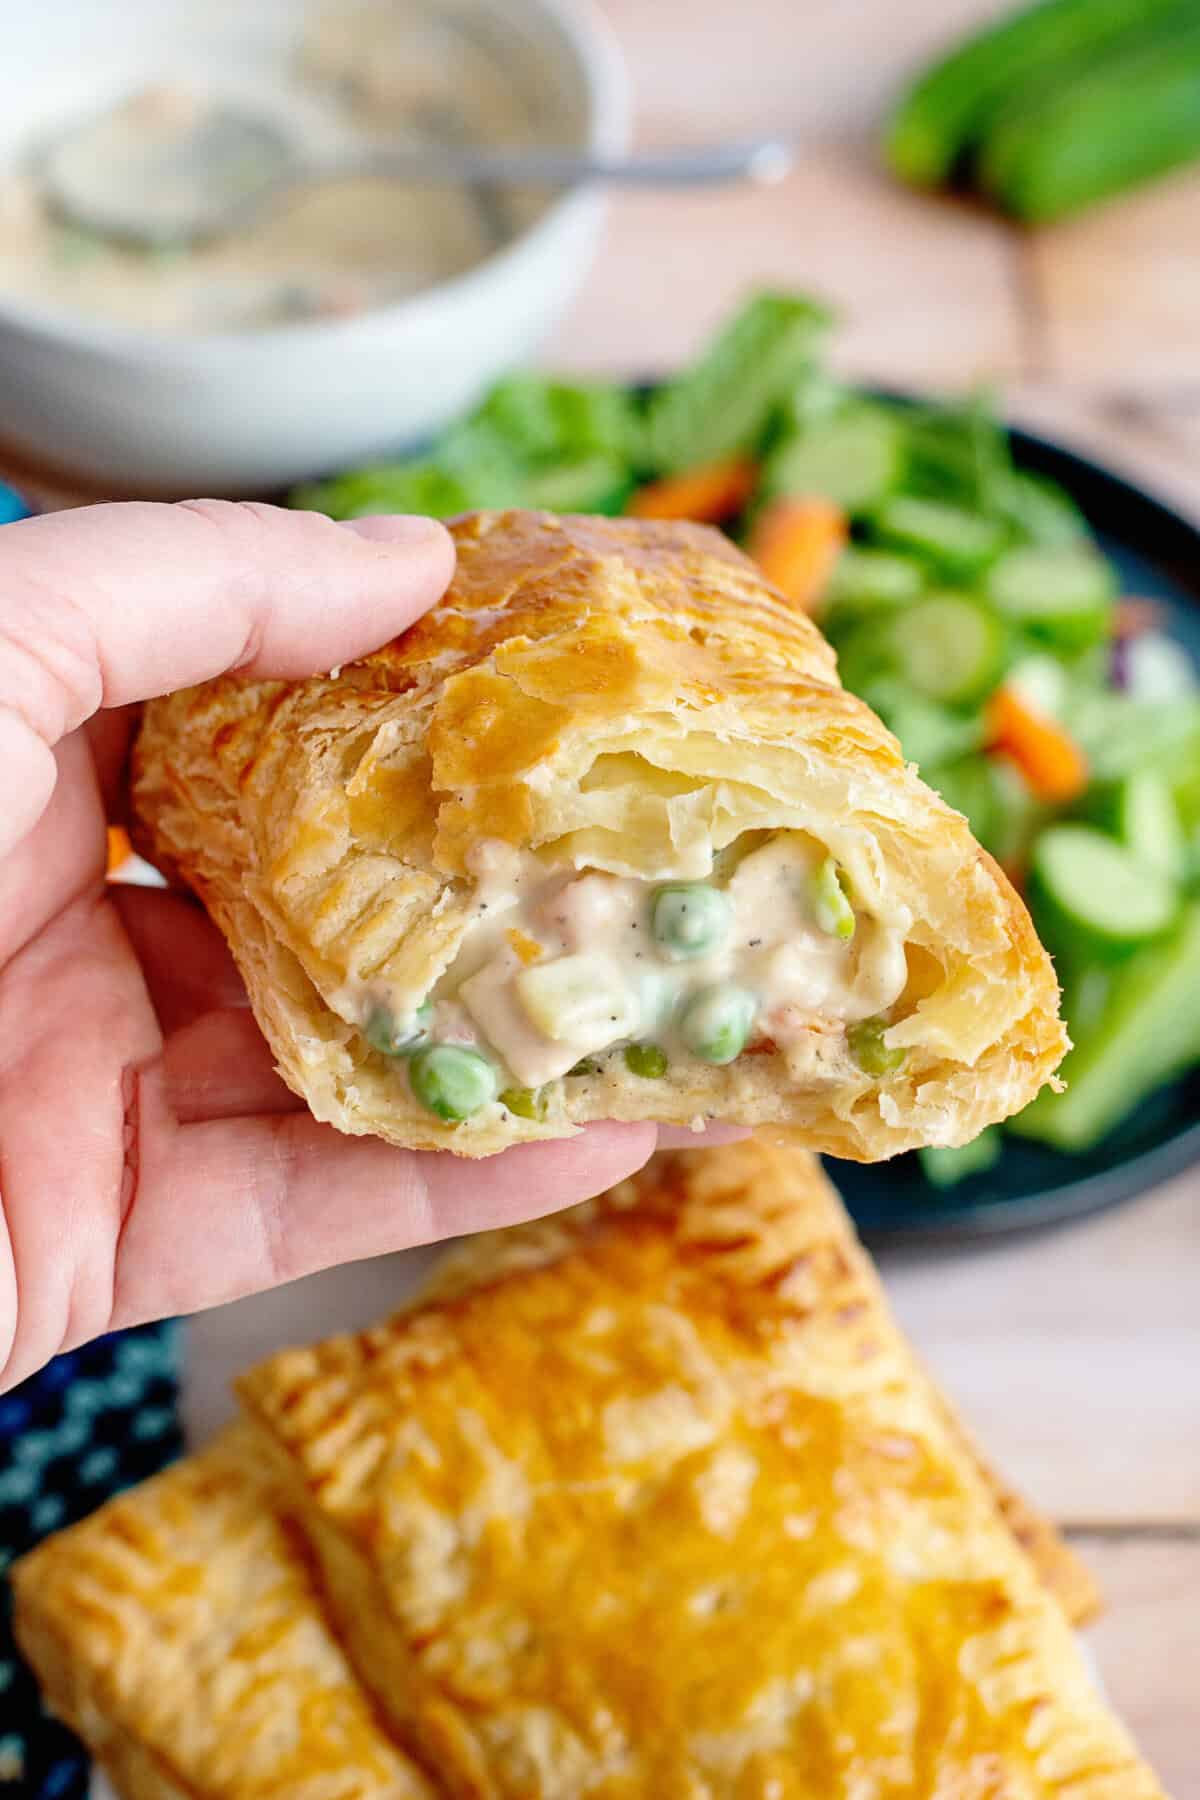
They’re buttery, golden brown, and filled with tender shredded chicken (I like to use rotisserie chicken for that extra flavor boost), creamy sauce, and hearty vegetables. Everything’s tucked into puff pastry sheets that puff up beautifully in the oven, giving you that crispy, flaky crust that breaks apart just right with every bite.
If you’re a fan of Trader Joe’s mini pot pies or anything with that homey vibe, you’re going to love these.
And if you’re itchin’ for the comforting taste of a classic pot pie, we have the perfect Chicken Pot Pie recipe for you!
Ingredients You’ll Need
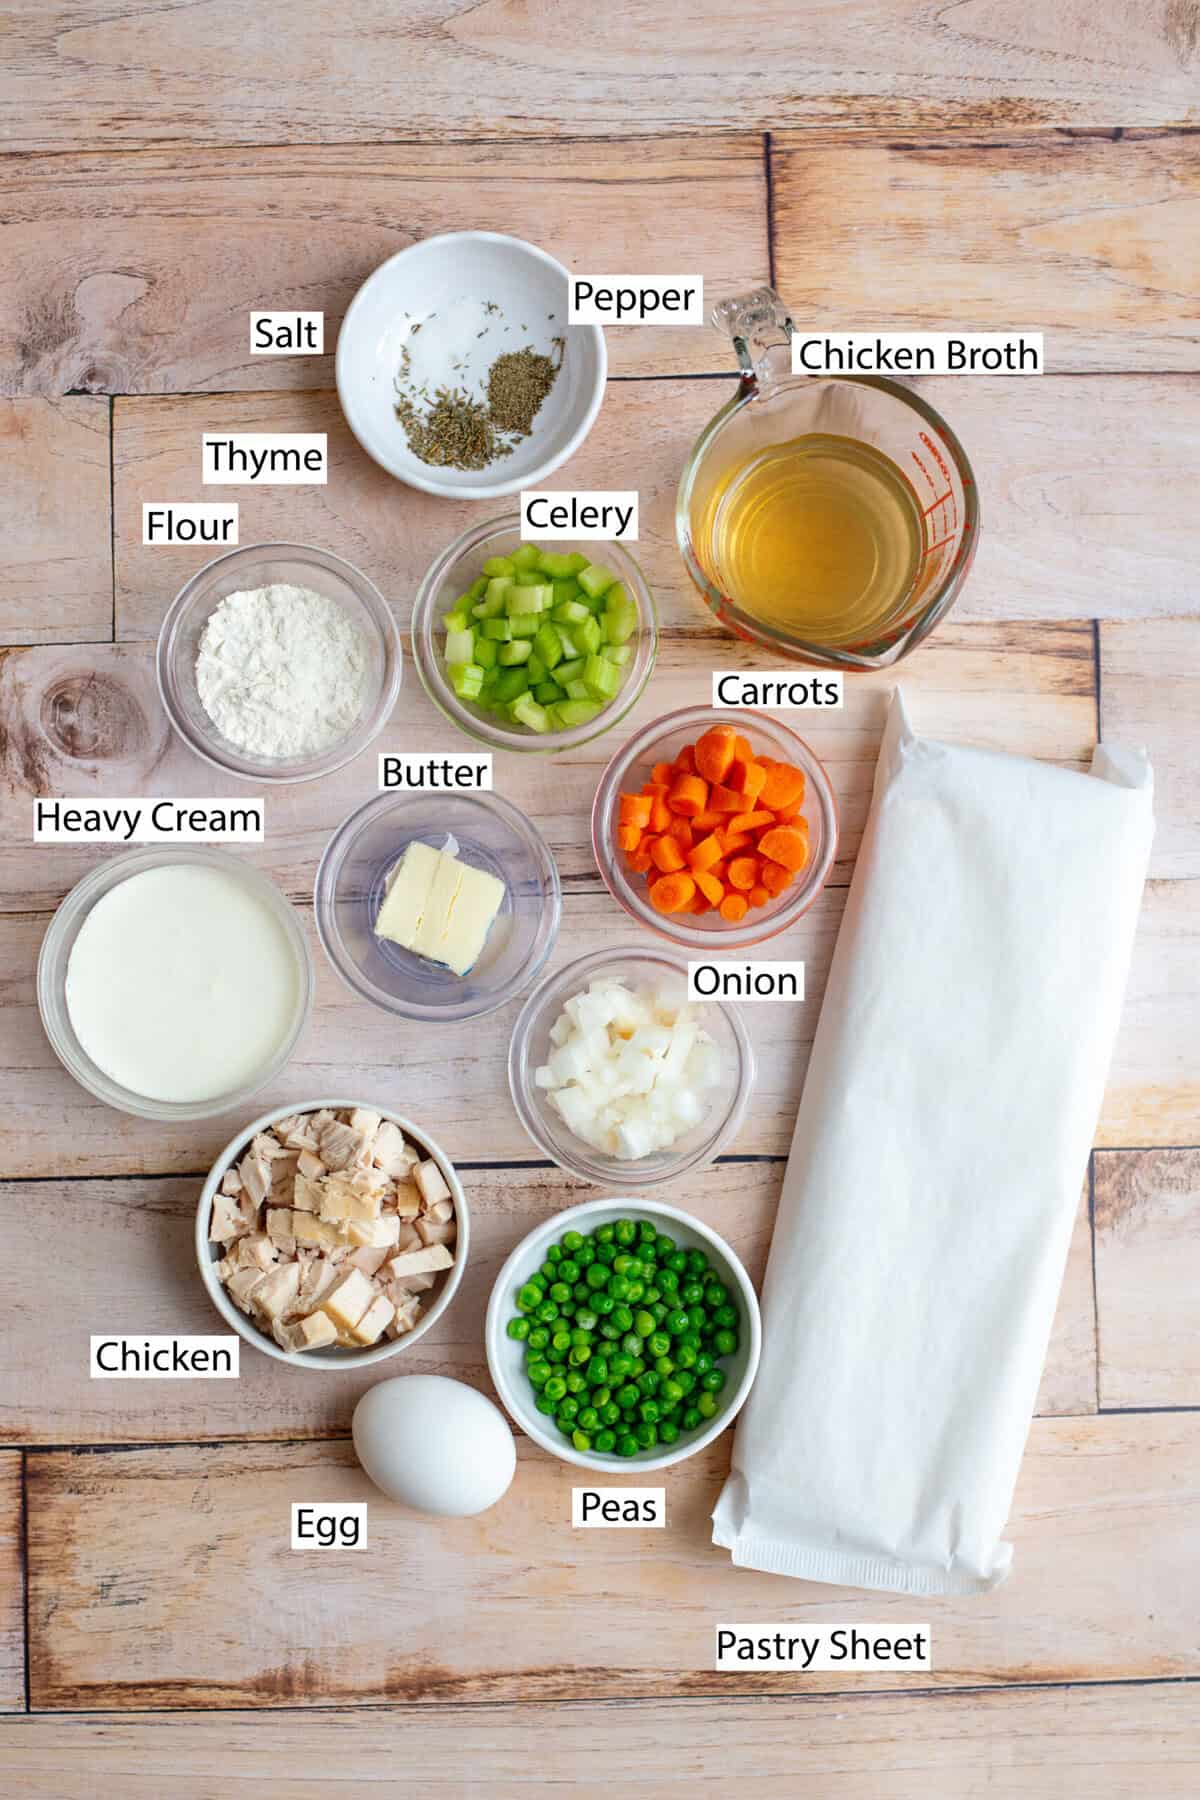
- Unsalted butter
- Diced onion
- Diced carrot
- Diced celery
- All-purpose flour
- Chicken broth (or chicken stock if you prefer)
- Heavy cream
- Cooked, shredded chicken
- Frozen peas
- Dried thyme
- Salt
- Black pepper
- Puff pastry, thawed but still cold
- Egg, beaten with water (for egg wash)
A Few Housekeeping Items
- Keep your puff pastry cold: Warm pastry won’t puff as nicely, so pop it in the fridge if it starts getting soft.
- Don’t overfill: A tablespoon or two of filling per pie is plenty; it’ll expand as it bakes.
- Add a flavor boost: A splash of hot sauce, a pinch of garlic powder, or some extra onion extract adds just the right kick without overpowering the creamy filling.
Step-by-Step Instructions
1. Cook the Chicken Pot Pie Filling
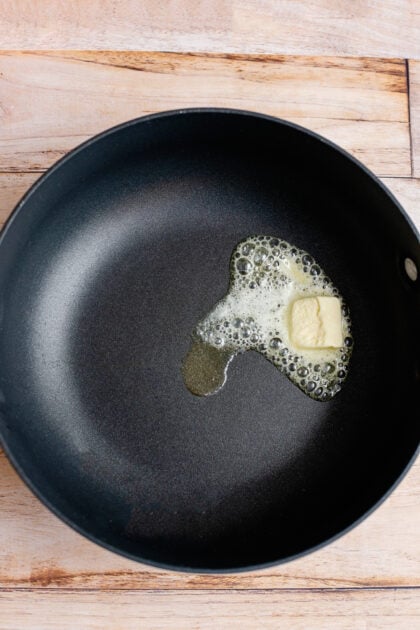
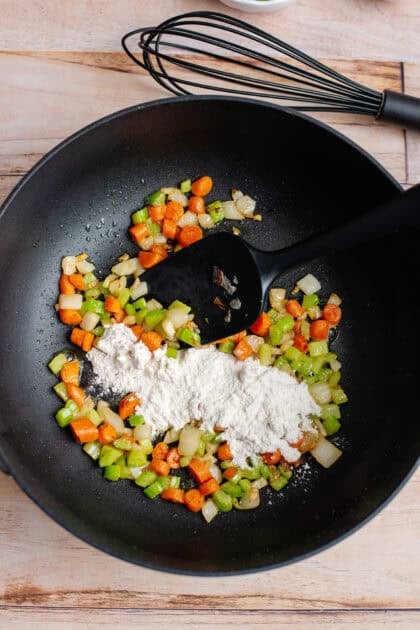
Start by melting butter in a large skillet over medium heat. Add diced onion, carrot, and celery, and cook until softened, about 5 minutes. Sprinkle in the flour and cook for another minute to get rid of that raw flour taste.

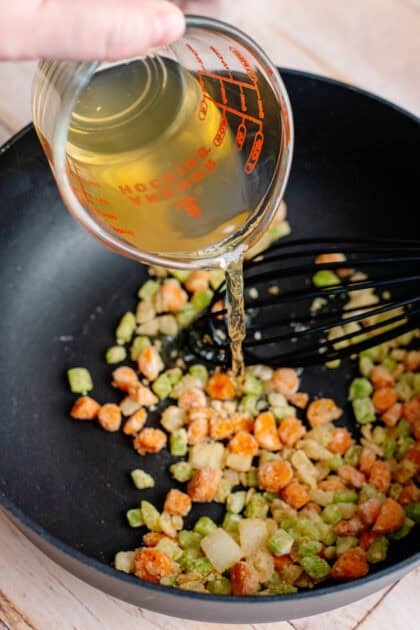
Slowly whisk in chicken broth (or chicken stock) and heavy cream, stirring constantly, until the sauce thickens and turns silky smooth.

Stir in the shredded chicken, frozen peas, thyme, salt, and black pepper. Once it’s well combined, remove it from the heat and let the filling cool completely. Chilling it for at least 30 minutes makes assembling the hand pies so much easier (and less messy).

2. Assemble the Hand Pies
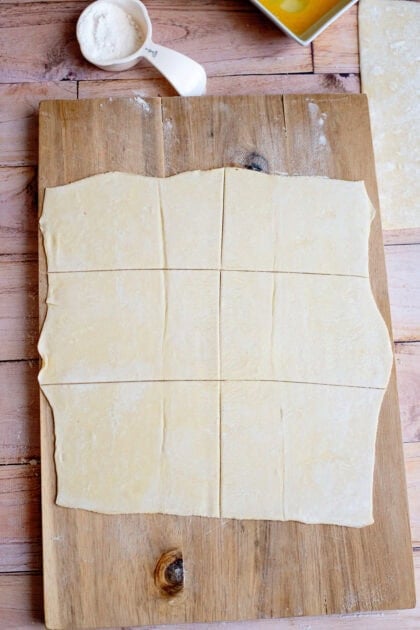
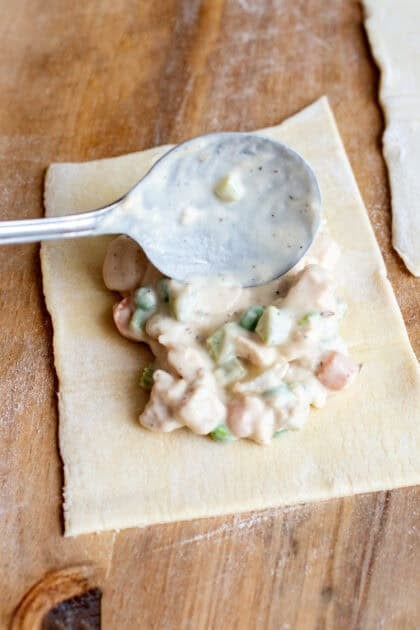
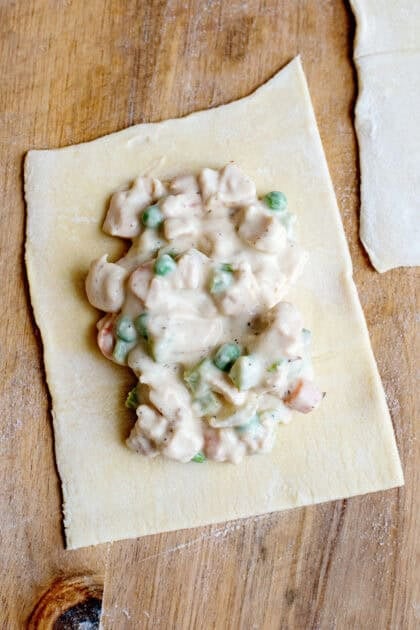
On a lightly floured surface, roll out your puff pastry and cut it into 5-inch rectangles or circles; a cookie cutter works great if you want uniform pies. Spoon a bit of your chilled filling into the center of half the pieces, leaving space around the edges.
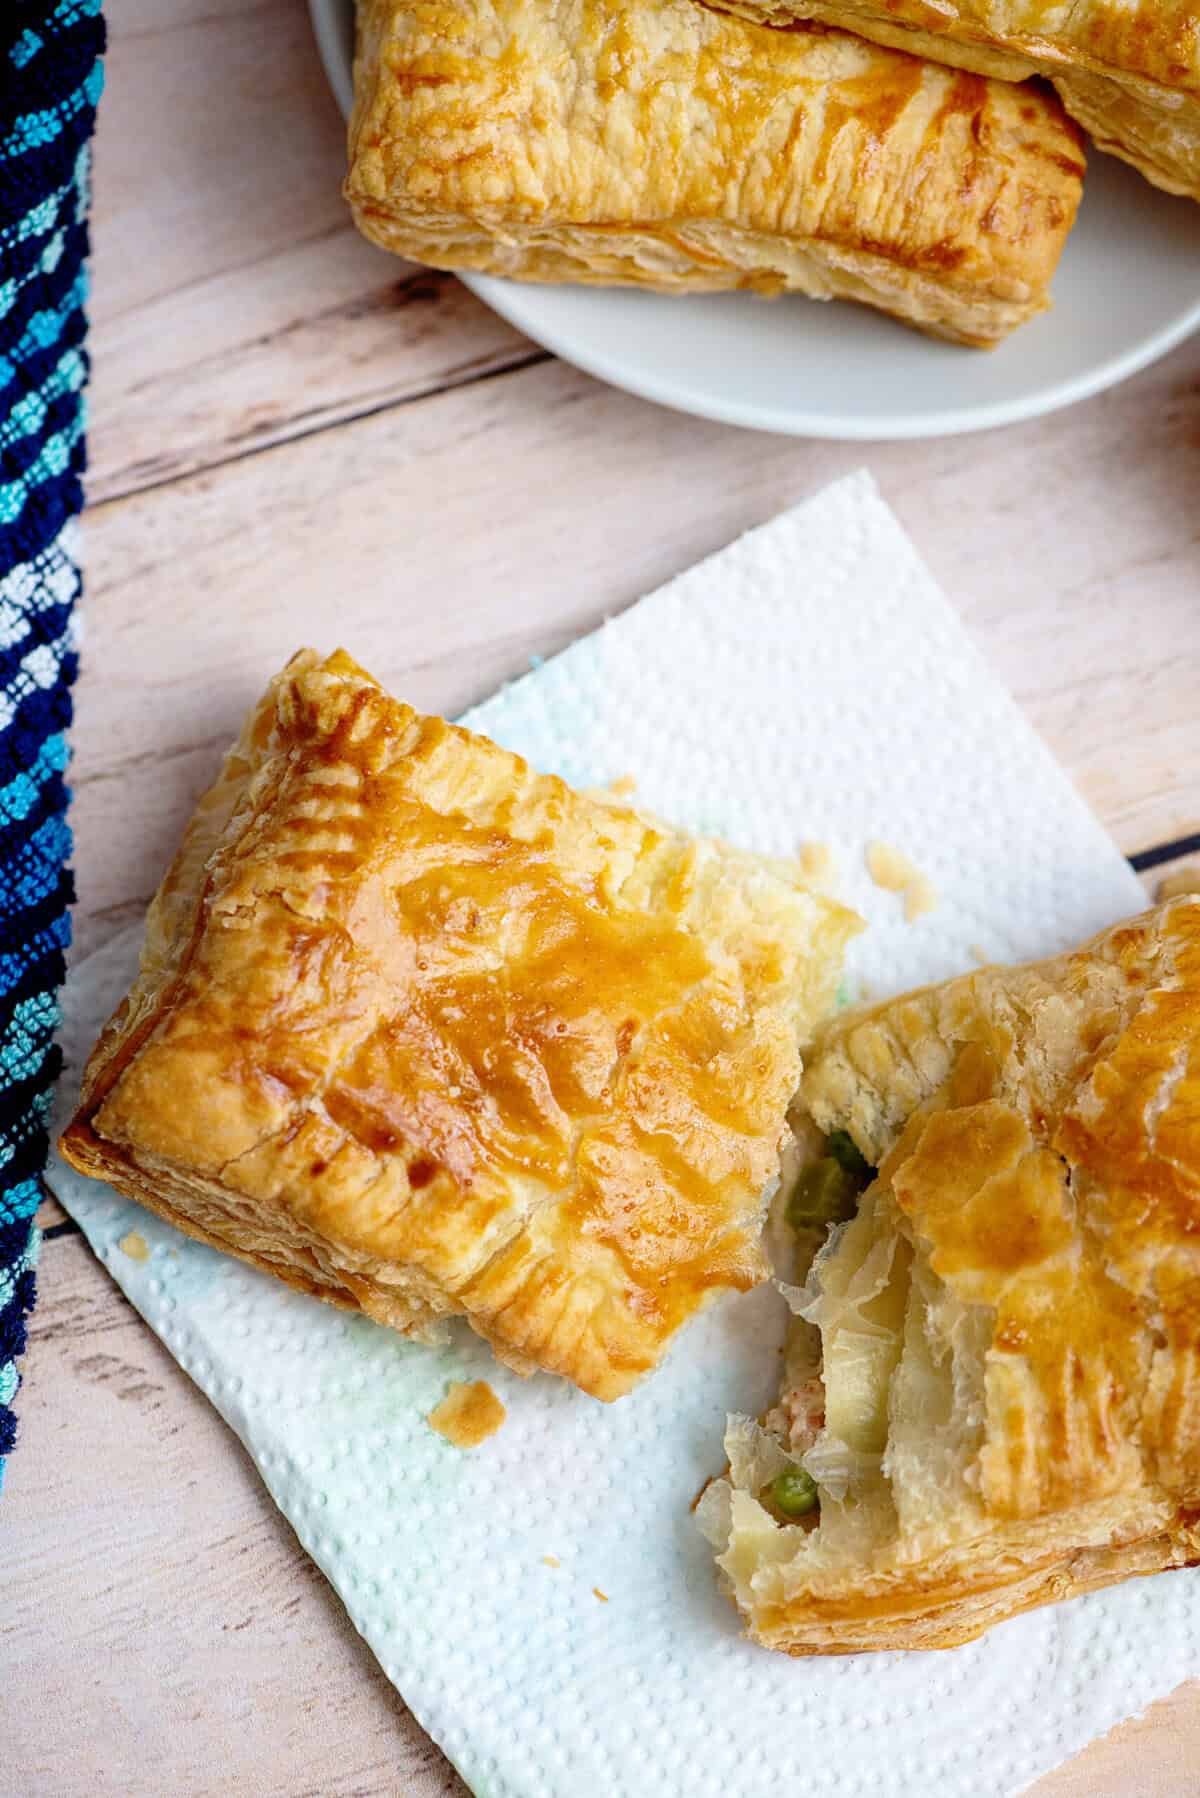
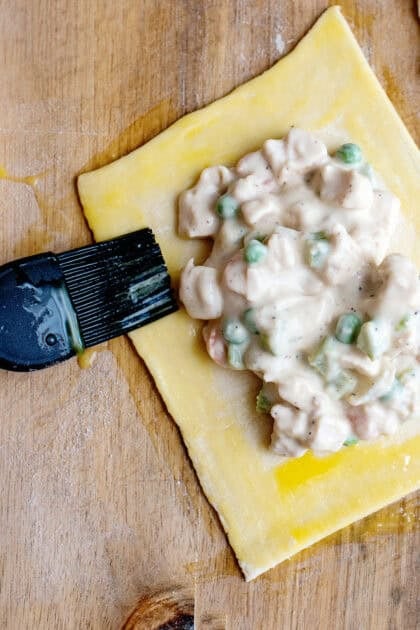
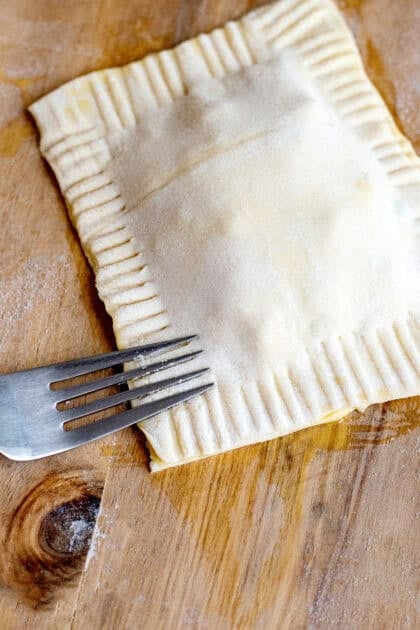
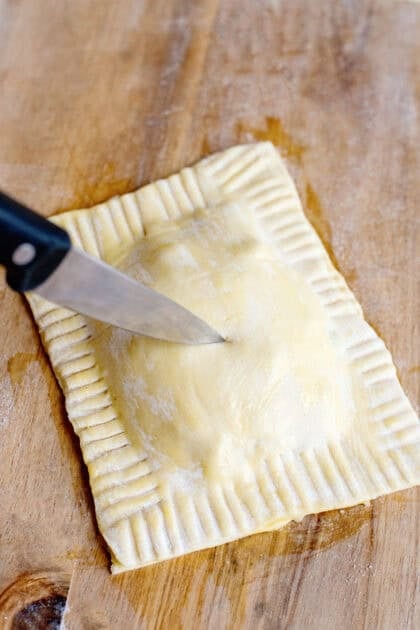
In a small bowl, make your egg wash and brush the edges of the mini chicken pot pies, then place the other pastry pieces on top. Press around the edges with a fork to seal them up tight. Cut a few small vents in the tops; it keeps them from bursting while baking.
3. Bake Until Golden
Preheat your oven to 400°F and line a baking sheet with parchment paper. Arrange your hand pies on the sheet, brush the tops with egg wash, and bake for 25–30 minutes, or until the crust is golden brown and puffed.

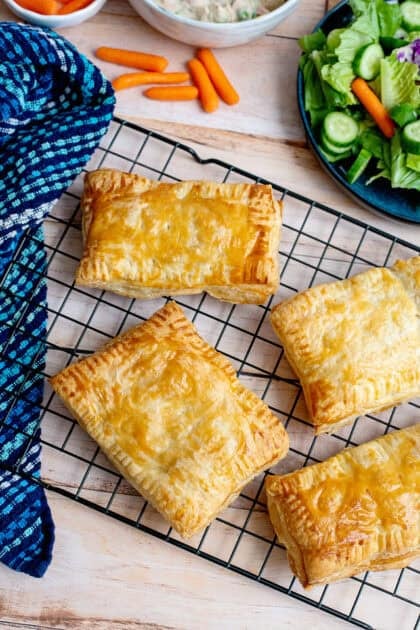
Once baked, let the handheld pies cool at room temperature on a wire rack for 5–10 minutes before digging in. The filling will thicken up a bit as they rest, which makes them easier (and safer!) to eat.
Serving and Storage
These handheld chicken pot pies are delicious hot from the oven, but also make great make-ahead meals! Store cooled pies in an airtight container in the fridge for up to 3 days. Reheat them in a 350°F oven until warm and crisp again.
They also freeze very well, just wrap individually in plastic wrap, then foil, and freeze for up to 2 months. To reheat, thaw overnight in the fridge and bake at 350°F until warmed through.
Frequently Asked Questions
You sure can! It’ll taste more like a traditional pot pie, just with a sturdier bite. Brush the tops with egg wash to help them brown nicely.
These little pies are hearty on their own, but a fresh, Tangy Mustard Slaw, Roasted Potatoes, Green Beans, or even a nice Turkey Gravy with Homemade Mashed Potatoes make a perfect pairing!
Make sure the edges are well-sealed and use a fork to crimp tightly. A chilled filling also helps prevent overflow while baking.
Ingredients
For the filling:
- 1 tablespoon unsalted butter
- ¼ cup diced onion
- ¼ cup diced carrot
- ¼ cup diced celery
- 2 tablespoons all-purpose flour
- ½ cup chicken broth
- ¼ cup heavy cream
- ½ cup cooked shredded chicken (I used shredded rotisserie for more flavor)
- ¼ cup frozen peas
- ¼ teaspoon dried thyme
- Salt and pepper to taste
For the pastry:
- 2 sheets puff pastry thawed but still cold
- 1 egg beaten with 1 teaspoon water (for egg wash)
Instructions
- Melt the butter in a skillet over medium heat and sauté the onion, carrot, and celery until softened. Stir in the flour and cook for about a minute to remove the raw taste, then slowly whisk in the chicken broth and milk until the mixture thickens into a creamy sauce.
- Add the shredded chicken, peas, thyme, and a pinch of salt and pepper. Stir until everything is well combined, then remove from the heat and let it cool completely. Chilling the filling for at least 30 minutes makes assembling much easier.
- Roll out the puff pastry on a lightly floured surface and cut it into six rectangles or circles (6 in each pastry sheet), roughly 5 inches wide. Spoon a small amount of the chilled filling into the center of half of the pieces, leaving a border around the edges. Brush the edges lightly with the egg wash and place the remaining pastry pieces on top. Press around the edges to seal and crimp with a fork. Cut small vents on top to let steam escape.
- Preheat the oven to 400°F (200°C) and line a baking sheet with parchment paper. Place the pies on the sheet, brush the tops with more egg wash, and bake for 25 to 30 minutes, or until golden and puffed. Let them cool for a few minutes before serving; the filling will thicken slightly as they rest.
Haven’t tried this yet, but so happy I can make this with gluten-free puff pastry!! Thank you!