
Easy Birthday Cake Recipe From Scratch
Looking for a super Easy Birthday Cake recipe that tastes like it came from a fancy bakery? You’ve found it! This cake has everything: creamy buttercream frosting, fluffy, moist layers, and fun rainbow sprinkles. Best of all, you only need about an hour and some basic pantry ingredients. No box mixes or tricky steps here, this delicious dessert is perfect for beginners!

A Quick Look At The Recipe
- Recipe Name: Easy Birthday Cake From Scratch
- Serves: 4
- Main Ingredients: all-purpose flour, sugar, unsalted butter, baking powder, salt, vanilla, milk, eggs
- Why You'll Love It: This deliciously easy birthday cake from scratch features creamy frosting and multiple fluffy yet moist rainbow cake layers.
The Easiest Ever Birthday Cake Recipe
Sometimes, you just want to treat yourself or a loved one to a homemade cake – no box mix, just 100% love. But let’s be real, not all of us are pro bakers, and making a cake from scratch can feel a little scary. Well, I promise you have nothing to worry about with this easy birthday cake recipe! It’s pretty hard to mess up, and I’ve filled this page with tips and tricks to guide you along the way.
So, what do you get when all is said and done? A buttery vanilla cake that’s fluffy, moist, and melts in your mouth. Now, I add sprinkles to make a fun rainbow effect, but you don’t have to. It will still have the same irresistible taste. It’s all topped with a delicious buttercream frosting, the perfect creamy complement.
If you want to try different flavors of cake, check out my Chocolate Velvet Cake With Cream Cheese Icing or Coca-Cola Cake!
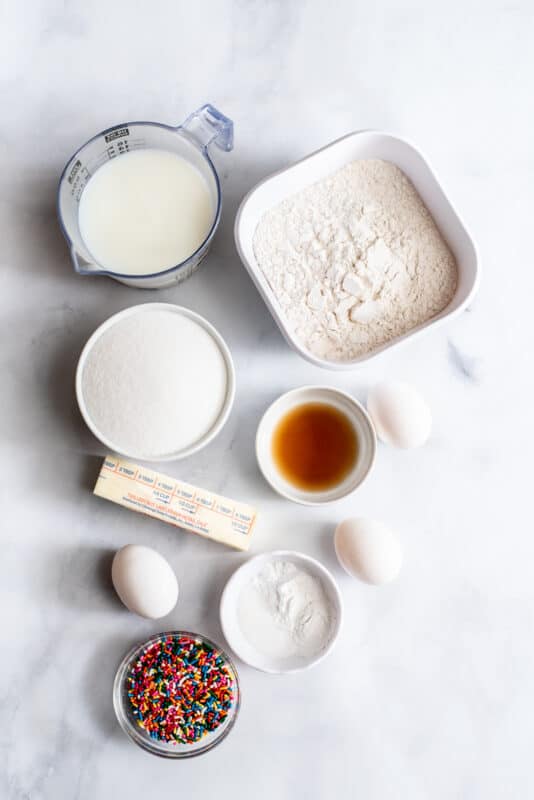

Recipe Ingredients
- Sugar
- Milk (any kind works!)
- All-purpose flour
- Baking powder (make sure it’s not expired!)
- Salt
- Vanilla
- Eggs
- Butter
- Sprinkles (if you’ve got a hankering for a rainbow-flecked cake!)
- Confectioner’s Sugar
My #1 Secret Ingredient for Delicious Icing
One of my secret ingredients that I love to add to my easy birthday cake icing is butter flavoring. You can use it in addition to vanilla or in place of vanilla extract, depending on your personal taste or mood on any given day. A lot of bakeries use this, too. This is completely optional though and vanilla extract does just fine on its own.

Fancy Up Your Easy Birthday Cake
- Flavor Variations: Experiment with different flavor extracts like almond, lemon, or coconut for a unique twist on this classic recipe.
- Filling Options: Consider adding a filling between the cake layers. Raspberry jam, lemon curd, or chocolate ganache are excellent choices.
- Decorative Touches: Customize the cake with decorations like edible glitter, chocolate shavings, or fresh fruit for an extra special presentation.
- Alternate Frosting: If buttercream isn’t your preference, cream cheese frosting or a ganache glaze can be wonderful alternatives. You can also try my 7-minute frosting for something super easy!
- Layering Techniques: To achieve even layers, consider using cake strips or a cake leveler. This ensures a professional finish.

How to Make An Easy Birthday Cake From Scratch
1. Preheat the Oven
To begin, preheat your oven to 350°F. Then prepare two cake pans by either greasing and flouring them or by spraying the living mess out of them with cooking spray as I do.
The trick for pans that like to stick: If you have a cake pan with a reputation for sticking, then grease it with shortening and powder it with flour. If you have a pan like 90% of all other cake pans, a generous dousing of cooking spray will work just fine!
2. Cream Butter & Sugar
Next, put your softened butter and sugar into a large mixing bowl. Using an electric mixer, cream these together until they’re light and fluffy.


3. Mix the Wet & Dry Ingredients
Now in a separate bowl, use a spoon to stir together the flour, baking powder, and salt.
In another small bowl (the hardest part of this recipe is the dishes afterward), stir together the vanilla, milk, and eggs until well combined.


4. Slowly Combine
Now add a little of the wet mixture and a little of the flour mixture to the creamed butter and mix that well.
Why a little at a time? Adding the wet and dry ingredients gradually prevents the batter from separating and keeps the flour from flying everywhere (trust me, I’ve learned the hard way!).

Continue adding the rest of each, alternating between wet and dry, and keep mixing until everything is smooth and fully blended. This should take about 2-3 minutes.
Now if you want, add in a handful of sprinkles. You want to gently fold these into the cake mix because they will bleed their color pretty fast.


5. Bake Your Birthday Cake
Time to bake! Divide the batter evenly between your two prepared cake pans. Then pop them in the oven and bake for 30-35 minutes. You’ll know they’re ready when they’re lightly browned and a toothpick inserted in the center comes out clean.


Once baked, let those cakes cool in their pans for about 10 minutes before turning them out onto a wire rack to cool completely.

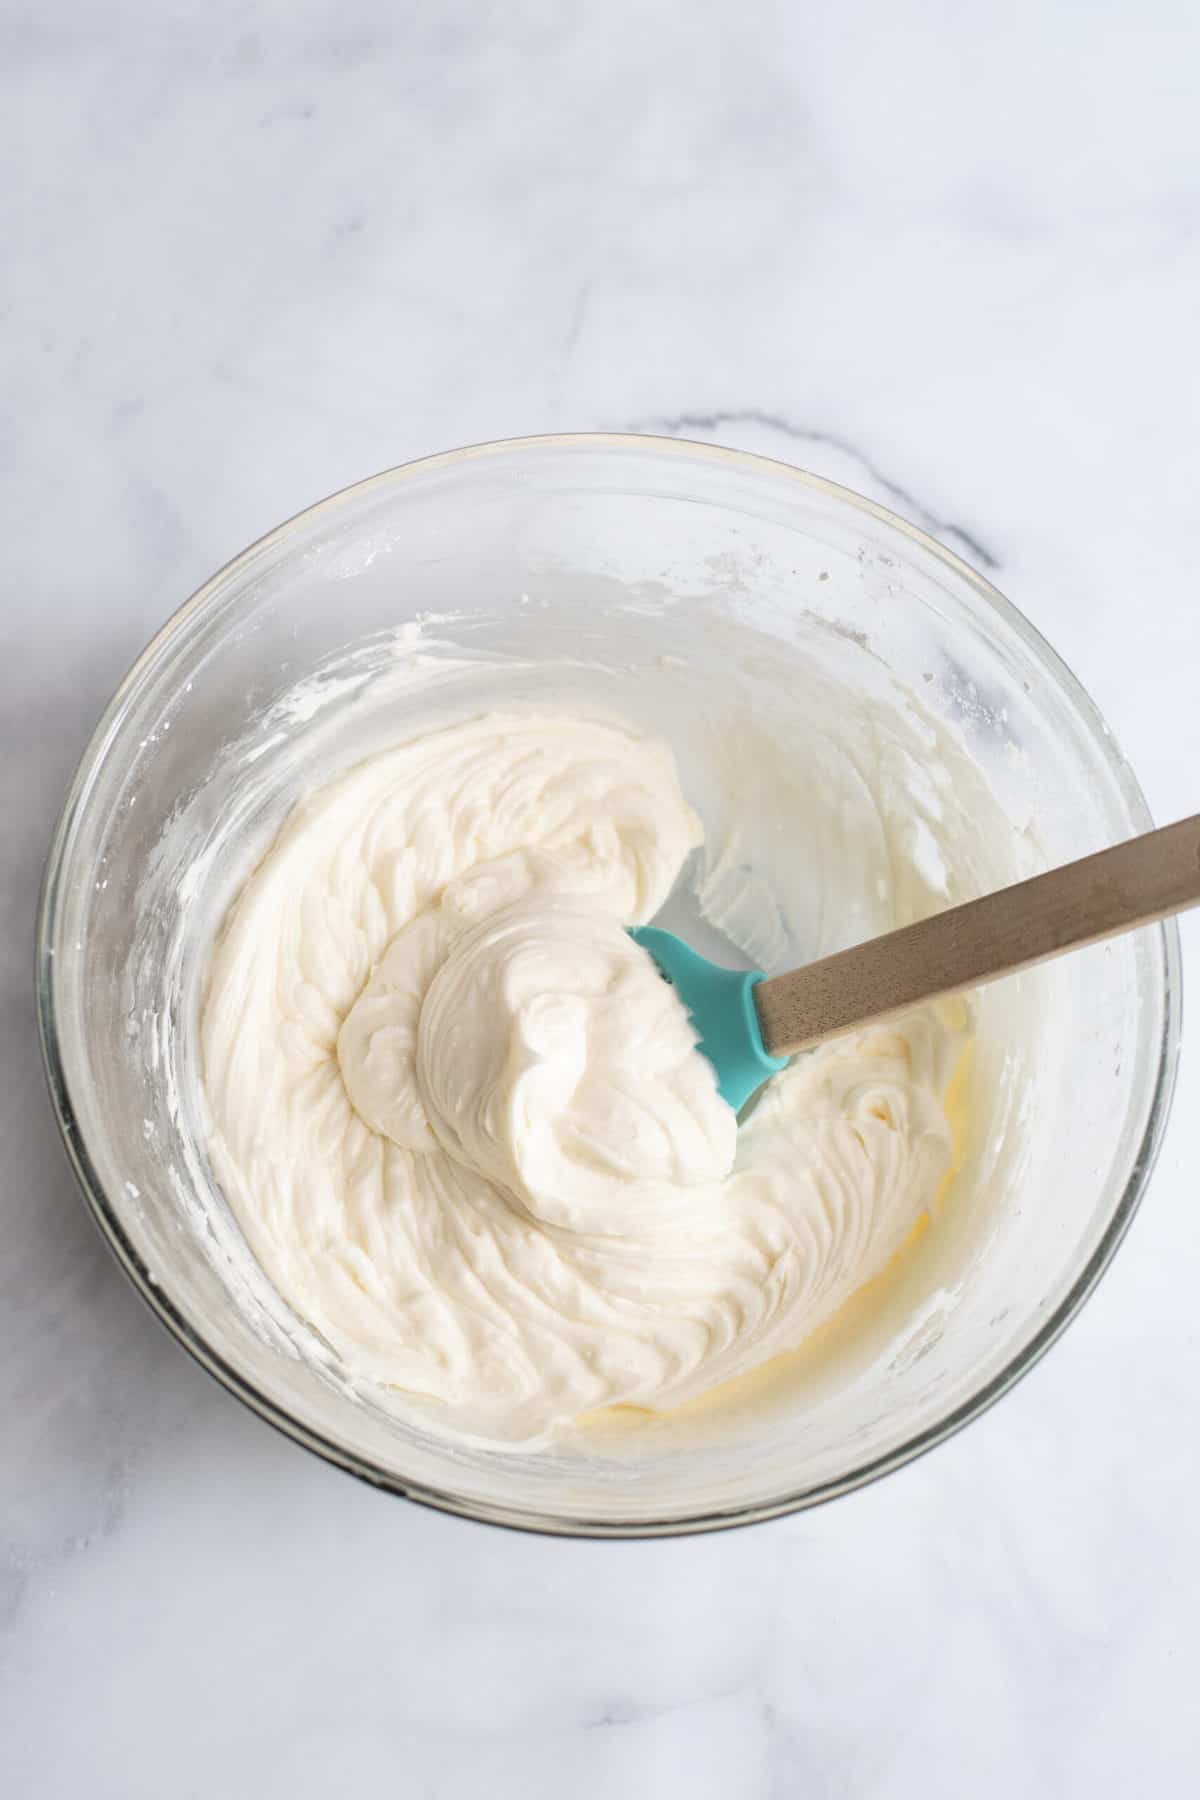
6. Make the Frosting
In a large mixing bowl, combine the room-temperature butter and a bit of powdered sugar. Using a stand mixer, beat them together until light and fluffy.
Now, mix in your chosen flavoring and half of the milk. After that, add the remaining sugar.


Note: Most recipes will call for you to gradually add in the remaining powdered sugar but in my world, we have things to do so dump all that in there and set the mixer going again until it’s mixed up real good.
Scrape down the sides of the bowl as you go, and add a little more milk if the frosting looks too thick.
When it’s done, your frosting will be all prettified, fluffy, and creamy!
7. Spread on the Frosting
Place the first level of your cake, top side up, onto a cake pedestal. Add a big old wallop of frosting.

Spread that around a bit. Be careful not to let your knife or spreader touch the actual cake because that will pull up crumbs into your icing. Just keep it smoothing over the top of the frosting itself.

Place the other cake layer top-side down on top of the first. Then add another glob of frosting on top of that and start spreading. Eventually, you’ll spread it to the sides as well.

What’s the best way to frost a cake?
I always add the globs to the top and spread them to the sides from the top of the cake. That is just the easiest way for me to do it. You do it however is easiest for you. There is no “right” or “wrong” way to ice a cake written in any federal document that I am aware of!


Now I want you to do me a favor…
Keep This Easy Birthday Cake Looking Homemade!!
Do you see those spread-y lines and swirls on that cake icing? Please don’t smooth them. I’m not sure at what point we started trying to make homemade things look store-bought, but I’ve been guilty of it more times than I can count. This is a beautiful homemade cake and it looks like a beautiful homemade cake. Trying to make it look like a store-bought cake just doesn’t make sense. It is gorgeous. You are gorgeous. You made a cake. Be proud of that. Now stick it on a gorgeous cake plate to show off your work!
If you want to add more sprinkles on top, do it as soon as you are done spreading the icing because soon the icing will set and the sprinkles won’t stick to it.

8. Serve & Enjoy the Celebration!
All set! Here is your easy birthday cake ready to dig into.
Mmm, Mmm! That’s going to be one heck of a birthday!

How To Store Homemade Birthday Cake
When stored in an airtight container, your birthday cake will last in the fridge for up to 4 days.
You can also freeze the unfrosted cake layers for up to 3 months. You’ll want to double-wrap them in aluminum foil before freezing and then thaw overnight before bringing them to room temperature and icing.
Easy Birthday Cake Recipe FAQs
Absolutely. You can bake the cake layers ahead of time and store them in the freezer until you’re ready to assemble and frost the cake.
A hand mixer can work just as well for both the cake batter and frosting. It may take a little more effort, but the result will be just as delicious.
No problem! Just use a 9×13 inch baking dish instead. You’ll get a lovely sheet cake. Just keep an eye on the baking time as it might be a bit different.
Yes, you can easily adapt this recipe to suit your dietary needs. For a gluten-free version, just swap the regular flour for a gluten-free blend. If you’re avoiding dairy, use your favorite dairy-free butter and milk substitutes.
P.S. gluten-free folks, don’t miss my gluten-free banana nut muffins!
Certainly! Adjust the baking time to approximately 18-20 minutes for standard-sized cupcakes.
A spongy or egg-y texture can sometimes happen if the eggs are mixed in too quickly or if the batter gets over-mixed after the eggs are added. Next time, try beating the butter and sugar together a little longer until it is really light and fluffy before adding anything else.
When you mix the eggs with the milk and vanilla, make sure they are well combined and then add them slowly while mixing on low. This helps everything blend more gently and gives the cake a better texture. It could also be that it baked just a little too long, so checking it a couple minutes early might help too.
If you tried this easy birthday cake recipe, please leave a review and let me know how it went!
Ingredients
- 2 ¼ cups all-purpose flour
- 1 ½ cups sugar
- ½ cup unsalted butter at room temperature
- 3 teaspoons baking powder
- 1 teaspoon salt
- 1 teaspoon vanilla
- 1 ½ cups milk
- 3 eggs
Buttercream Icing (This is a double recipe for a layer cake)
- 2 sticks butter at room temperature
- 4 teaspoons butter flavoring can use clear vanilla extract instead
- 6 cups confectioner’s sugar
- 4-8 tablespoons milk
Instructions
For the Birthday Cake
- Preheat oven to 350℉ and spray two 9-inch cake pans liberally with cooking spray, or grease and flour. (Can also use a 9×13-inch pan or line 24 muffin tins with paper liners for cupcakes).
- Combine sugar and butter in a large bowl and cream together with an electric mixer.1 ½ cups sugar, ½ cup unsalted butter
- In a medium-sized bowl, stir together the flour, baking powder, and salt with a spoon. In a separate bowl, stir together the eggs, milk, and vanilla until well combined.2 ¼ cups all-purpose flour, 3 teaspoons baking powder, 1 teaspoon salt, 1 ½ cups milk, 3 eggs, 1 teaspoon vanilla
- Add half of the wet mixture and the flour mixture to the creamed butter and mix until well combined. Add the remaining and continue mixing until fully blended and smooth, about 2 to 3 minutes.
- If you want to add sprinkles, gently stir them using a spoon, once the cake batter is fully blended.
- Divide the cake mix evenly among the two cake pans. Bake for 30 to 35 minutes, or until lightly browned and center springs back when lightly pressed. Remove from oven and allow to cool in pans for 10 minutes before turning out to cool completely.
For the Buttercream Icing
- In a large bowl, cream the butter and about 1 cup of confectioner's sugar with an electric mixer until light and fluffy. Add the butter flavoring, half of the milk, and the remaining sugar, and beat again until smooth and creamy, scraping down the sides and adding a little extra milk if needed.2 sticks butter, 4 teaspoons butter flavoring, 6 cups confectioner’s sugar, 4-8 tablespoons milk
- Ice the cooled cake (see photos and instructions in this post if needed) and enjoy!
Video
Notes
- I am making a double recipe of icing so I can decorate a two-layer cake. The recipe posted at the bottom is also double a normal recipe size. If you want less, you can easily half it. Half will also work fine for a 9×13 cake or for those who want to challenge themselves to use as little as possible when decorating a layer cake.
- If you have a pan with a reputation for sticking, then grease it with shortening and powder it with flour. If you have a pan like 90% of all other cake pans, a generous dousing of cooking spray will work just fine.
Happy birthday to Southern Plate. I am proud to know a smart, kind and good looking Alabama girl! I won’t tell how old I am, but have been cooking around 45 years and didn’t start as a child. This past year I finally tried and succeeded in making good ole Cathead biscuits, thanks to you.
🙂 Thank you Carol!!! So glad to hear about your success with the Catheads!!
Happy birthday Southern Plate and Christy! Thank you for sharing all of your wonderful recipes!
Thank you Joanne!!!
Thank you. Just THANK YOU. Inspiration. God Bless!
Thank YOU Sarah!!!
Congratulations Christy on 7 years of Southern Plate. I subscribe to several blogs but the one I read first is your Southern Plate, and sometimes when I need a dose of southern hospitality I search for your stories and wise wisdom, to make me feel better. Thank you for standing up for what you believe in as our world has become downright backwards. The Bible says the world will turn evil to good and good to evil and that has happened in some instances. Proud to be a subscriber to Southern
Plate and blessed to be able to have you in my life.
THank you so much Alice!!!
HAPPY BIRTHDAY SOUTHERN PLATE CHRISTY 🙂 and CONGRATULATIONS ON YOUR 7 YR. BLOG….and hope you have many,many more…The cake looks wonderful, wish I had a big slice right now :
I never did get to finish the days when you did the monthly video…..how can I go back and watch what I missed ?
Thank you so much!!! Just visit the original post, all the videos are listed there.
Congratulations. You are a gem. I wish you many, many more years keeping us well supplied with fantastic recipes.
Thank you so much Ann!!
Happy Birthday,! Love the beautiful cake. Thanks for just being you Christy!
Thank you Annette!!!!