
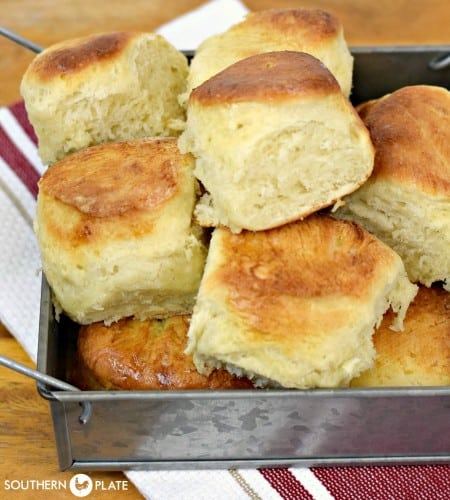
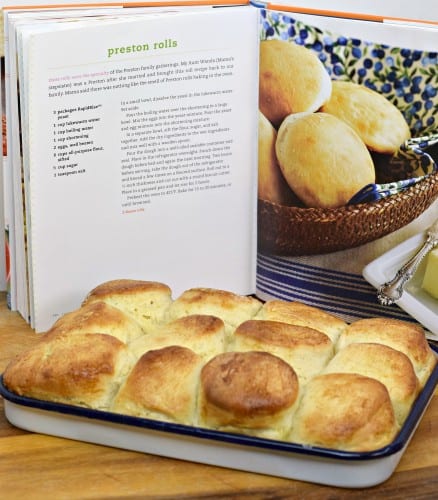
Homemade Dinner Rolls (a.k.a Preston Rolls)
Few things say “home” like the smell of freshly baked yeast rolls wafting from the oven. Around here, we call them Preston Rolls, a classic recipe passed down through families that has stood the test of time. These homemade dinner rolls are soft, fluffy, and just a little sweet, perfect for sopping up gravy, serving with Sunday dinner, or bringing to a holiday table. And let me tell you, nothing earns more compliments at a potluck than walking in with a basket of warm rolls wrapped in a dish towel.
Dinner roll recipes you won’t want to miss: Spoon Rolls, Easy Yeast Rolls, and Quick Mayonnaise Dinner Rolls!
A Quick Look At The Recipe
- Recipe Name: Homemade Dinner Rolls
- Serves: 2 dozen rolls
- Main Ingredients: boiling water, shortening, packets Rapid Rise Yeast, lukewarm water, eggs, all-purpose flour, sugar, salt
- Why You'll Love It: These homemade dinner rolls (Preston Rolls) are soft, fluffy, and beginner-friendly. Made with yeast dough that keeps up to a week in the fridge, they’re perfect for family dinners, holidays, or anytime you want fresh-baked rolls.
Don’t let the thought of working with yeast scare you off. This recipe is straightforward, beginner-friendly, and flexible enough that the dough can be made ahead and stored in the fridge for up to a week. That means you can bake a fresh batch whenever the craving strikes, or when unexpected company shows up. The secret is giving the dough plenty of resting time, which develops flavor and ensures those soft, pillowy rolls we all love. You’ll mix, chill, punch down, roll out, and bake. The process is simple, the ingredients are humble, and the results are unforgettable.
Before You Get Started
- Use rapid-rise yeast: I use Red Star rapid-rise yeast for this . I have never had good luck with Fleishman’s (the yellow packet). It only works for me about 50% of the time (although some people do swear by it), but I’ve never had the Red Star not work, so I just thought I’d throw that out there in case you had a choice.
- Make ahead friendly: The dough can stay in the fridge for up to a week. Bake a small batch daily if you’d like fresh rolls every night.
Recipe Ingredients

- Boiling water
- Shortening
- Rapid Rise Yeast (3 packets, such as Red Star)
- Lukewarm water
- Eggs
- All-purpose flour
- Sugar
- Salt
How to Make Homemade Dinner Rolls
- Make the shortening mixture: Place shortening in a heat-safe bowl or measuring cup. Pour boiling water over and stir until melted. Cool the shortening mixture: If it’s too hot when added to the yeast, it can kill it. Let it cool until just warm.

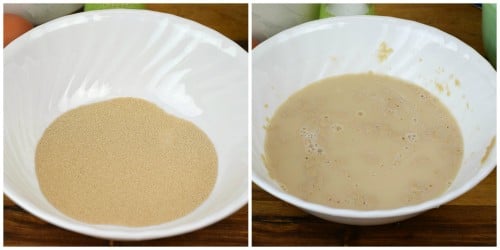
- Activate the yeast: In a medium bowl, stir yeast into lukewarm water until dissolved. Tip: When dealing with yeast bread recipes, it is important that your water be warm but not hot. A good rule of thumb is to think “baby bath water”, that is the temperature you are going for. If you’ve ever given a baby a bath, you know exactly what I’m talking about! If you haven’t given a baby a bath before, go for good and warm but not hot; just a little above lukewarm.
- Add the eggs: Stir eggs into the yeast mixture. Once the shortening mixture has cooled, add it in and stir well.
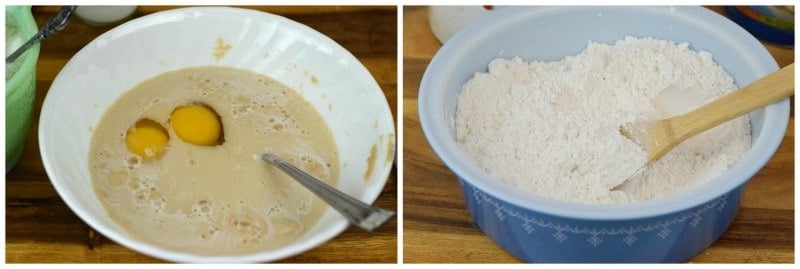
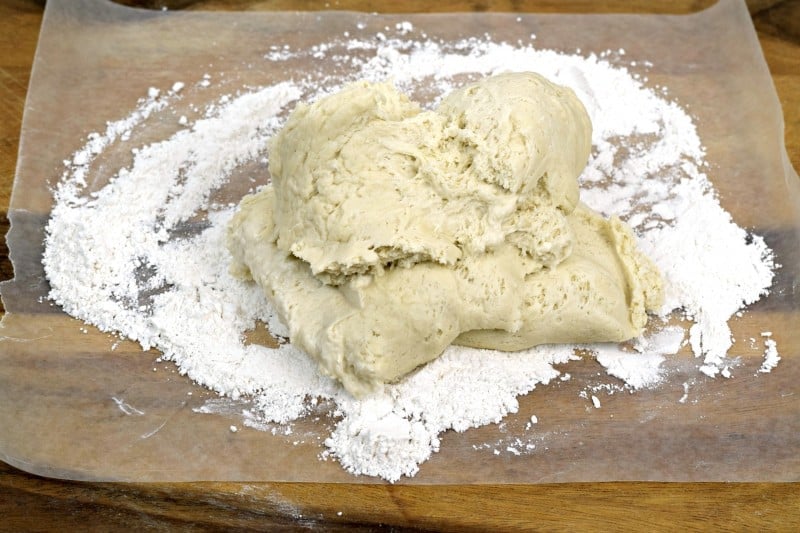
- Mix the dough: In a large bowl, combine flour, sugar, and salt. Add the yeast mixture and stir until a dough forms. Cover and refrigerate overnight.

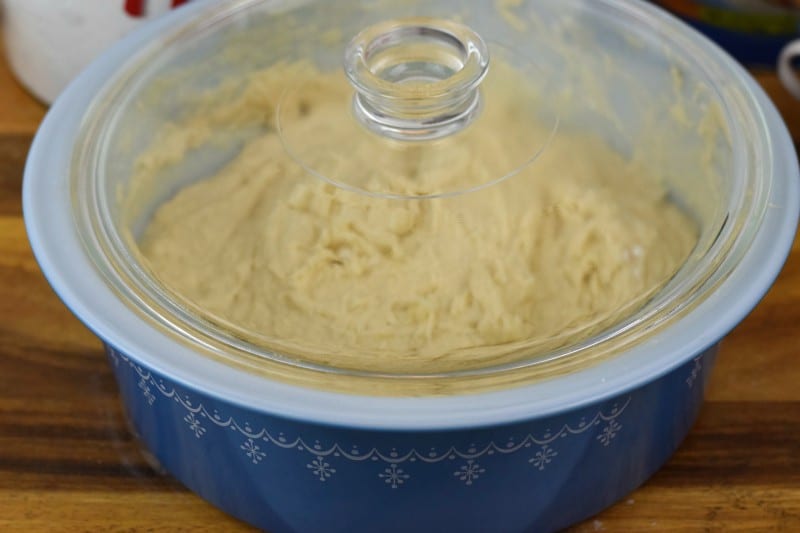
- Punch it down: Before bed and again in the morning, punch down the dough to release air bubbles.
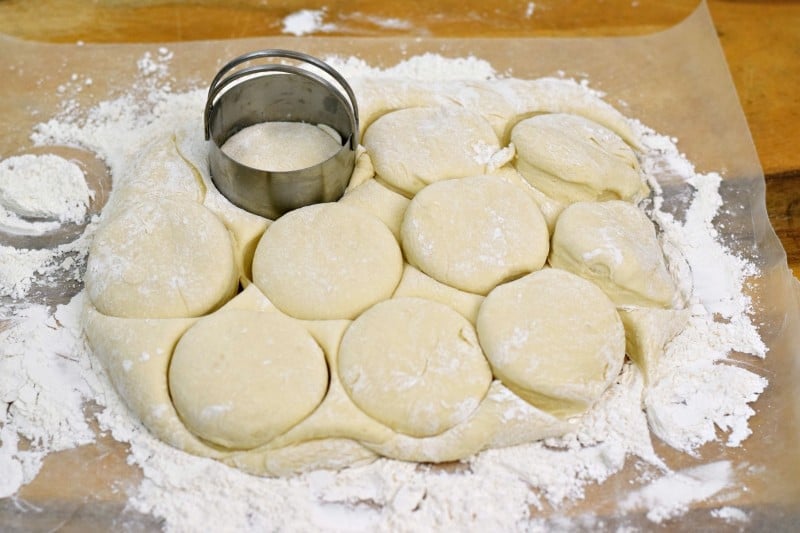
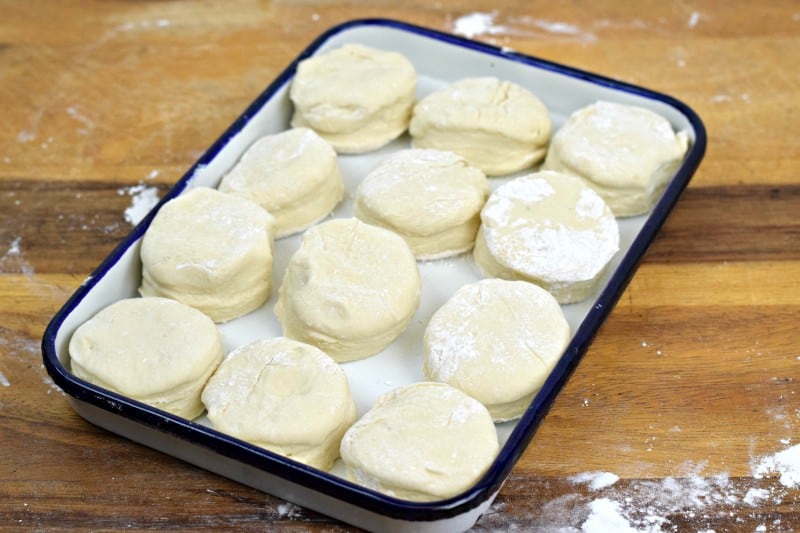
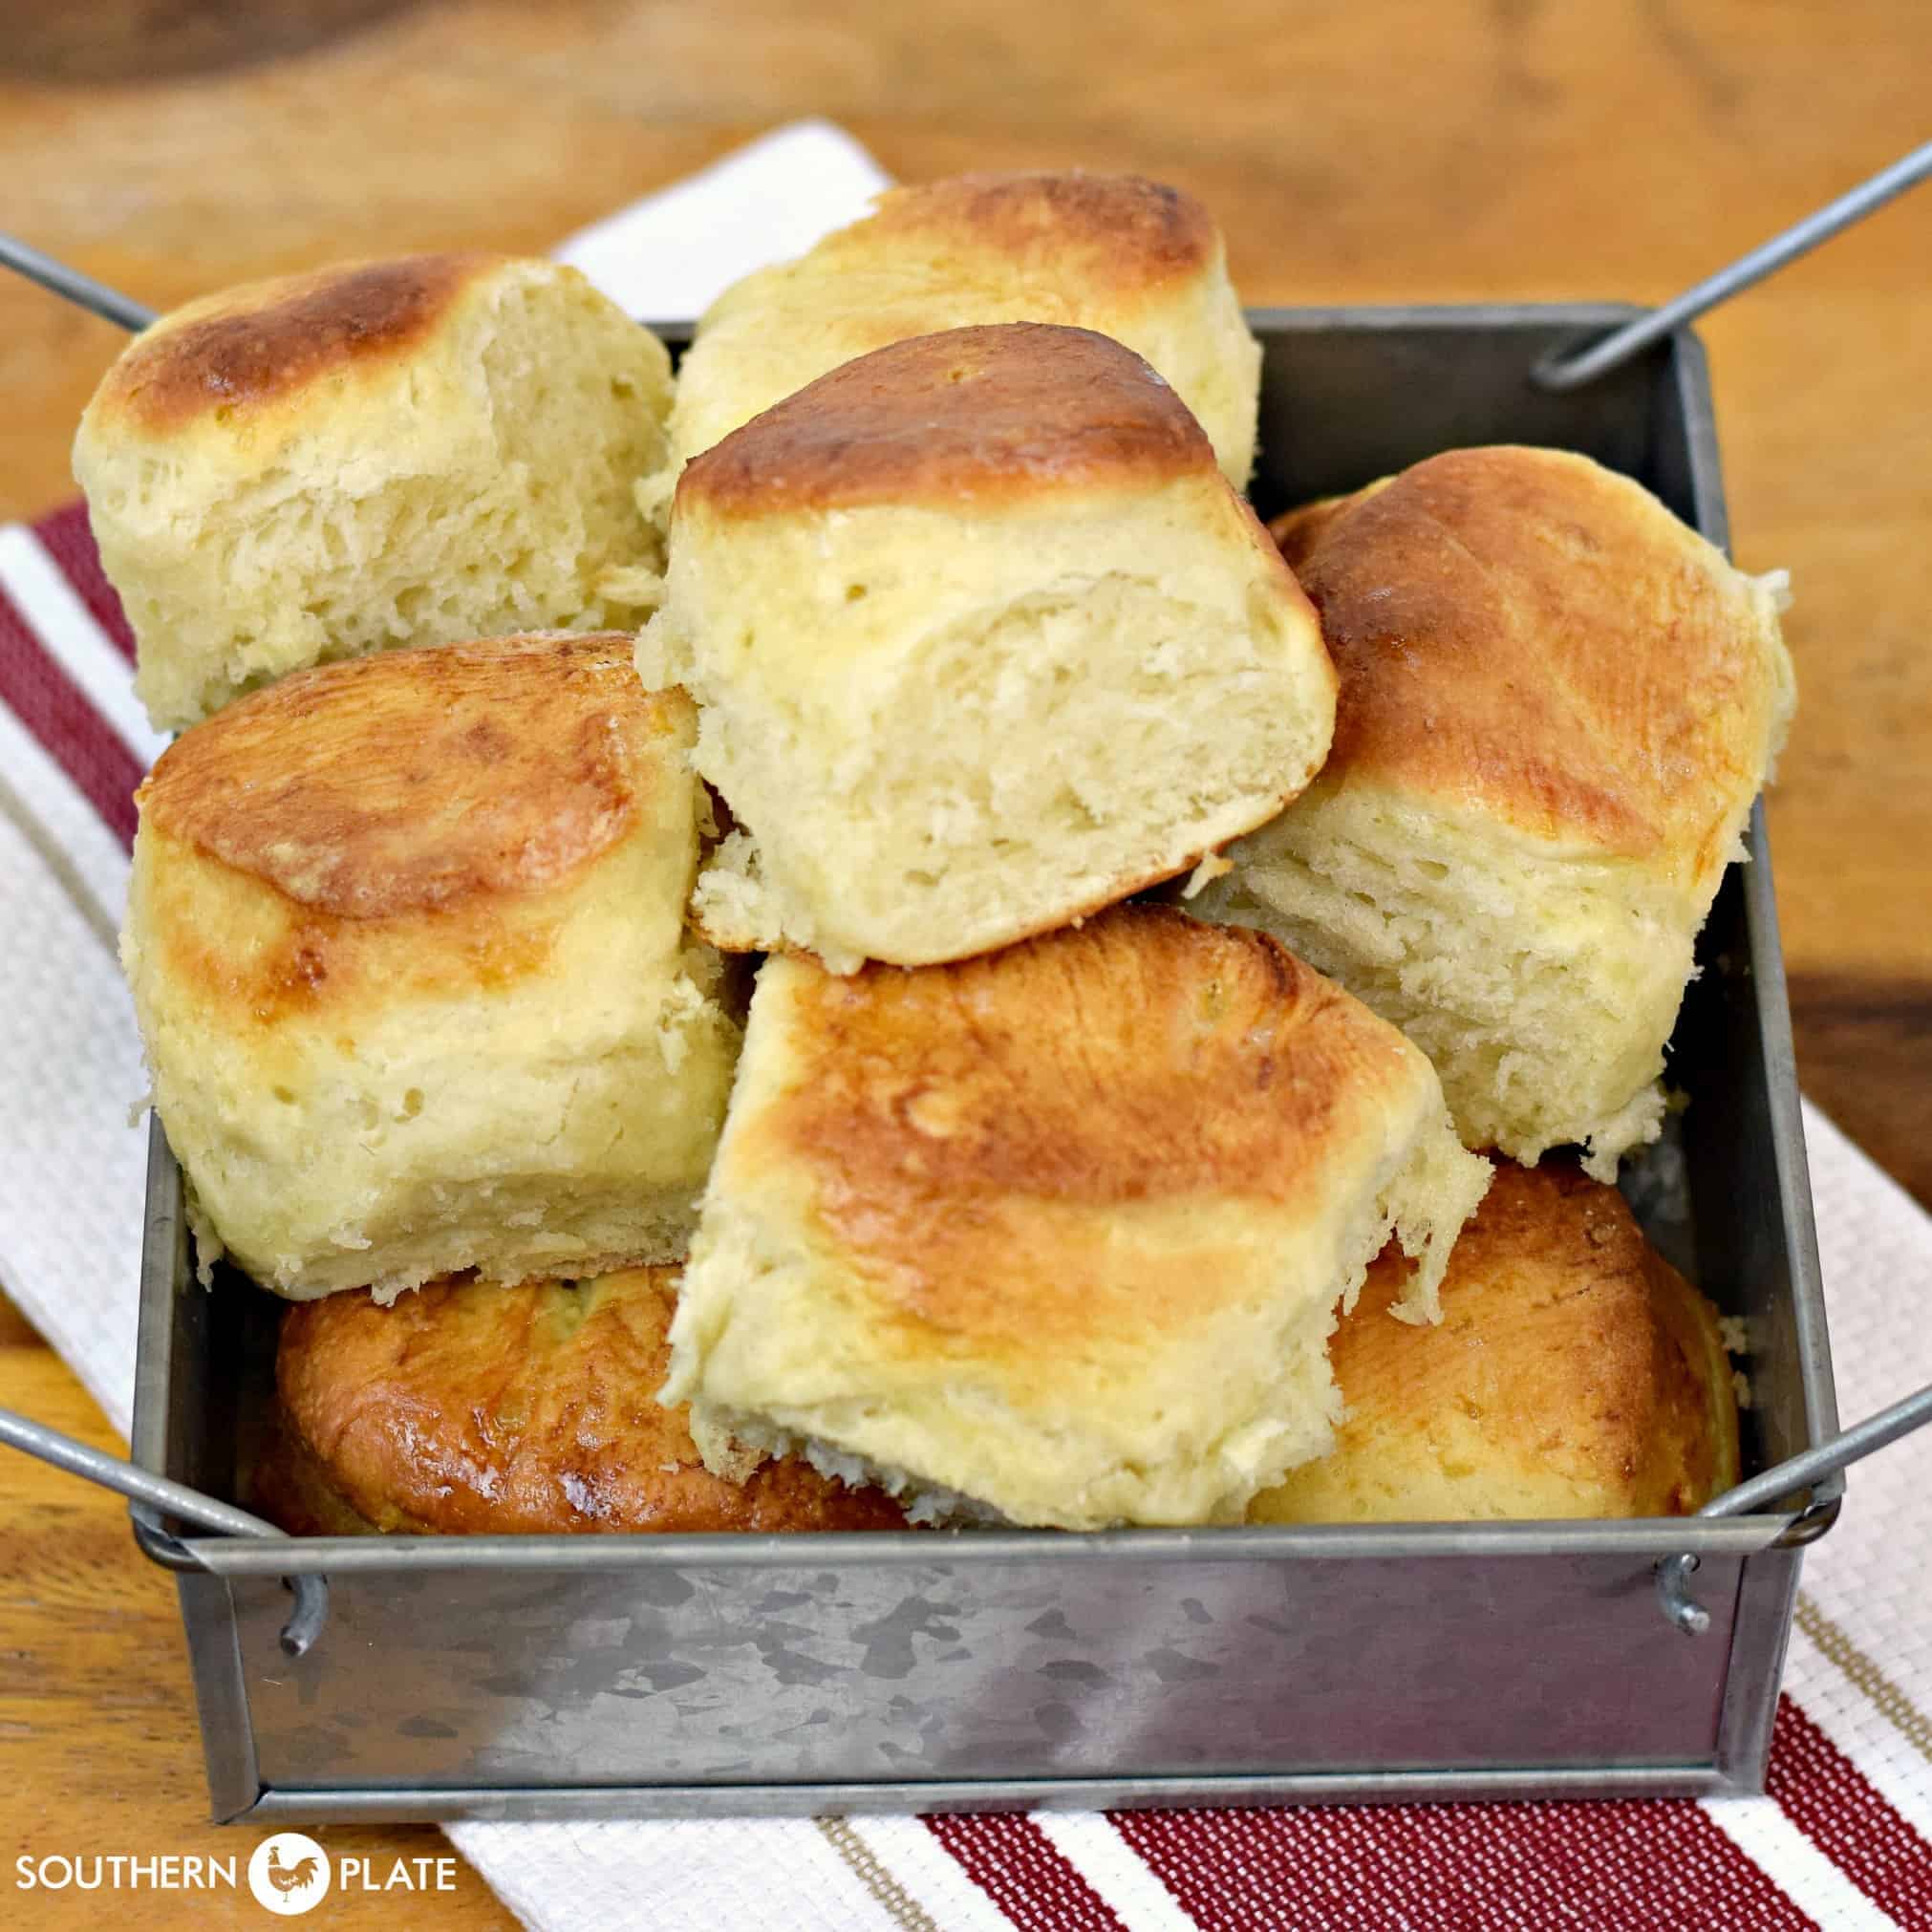
- Shape the rolls (about 2 hours before baking): On a floured surface, knead lightly, then roll dough to ½-inch thick. Cut with a biscuit cutter or glass. Place on a greased baking sheet, cover, and let rise for 2 hours.
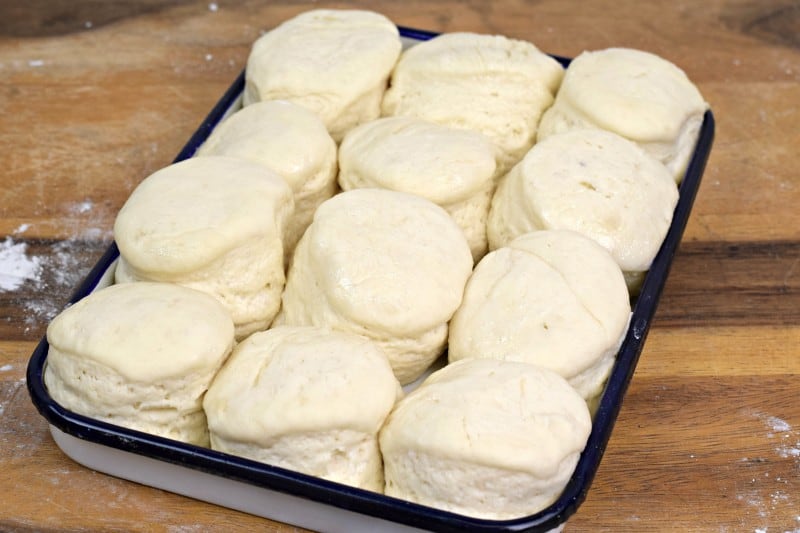
- Bake: Preheat oven to 425°F. Bake rolls for 15–20 minutes, until golden brown. For deeper color, brush tops with melted butter or a whisked egg wash before baking.
Serving Ideas
- Condiments: Serve warm with butter, honey, or jam for breakfast.
- Soups and Stews: Pair with Tomato Basil Soup, Alabama Camp Stew, or Crock Pot Chili for a cozy weeknight meal.
- Sliders: Make Pulled Pork Sliders, Ham and Swiss Sliders, or Irresistible, Easy Cheeseburger Sliders for game days, parties, or whenever you need to use up leftover rolls!
- Gravy Dishes: Serve your warm roll for dinner to soak up the sauce on a dish like Southern Cubed Steak and Milk Gravy and Crispy Breaded Pork Chops with Milk Gravy.
- Holiday-Style: Make a batch during the holidays and pile them high with turkey breast and baked ham leftovers. YUM!

Flavor Variations and Notes
- Sweet breakfast rolls: Add cinnamon and sugar to the dough or brush baked rolls with honey butter.
- Pan rolls: Instead of cutting with a biscuit cutter, roll dough into balls and place close together in a greased baking dish for pull-apart rolls.
- Freezer option: Shape the rolls and freeze before rising. When ready to bake, thaw, let rise, and bake as directed.
- Smaller batch: You can cut this recipe in half if you don’t need 2 dozen rolls.
- For garlic-flavored bread rolls, add a teaspoon of garlic powder to the dough or brush the rolls with a combination of minced garlic and butter before baking.
- Herb-loaded: You could also add 1 to 2 tablespoons of finely chopped fresh herbs, like rosemary or parsley, to the bread dough.
- Make them cheesy: For cheesy dinner rolls, mix 1/2 cup of shredded cheddar cheese into the bread dough. You could also add parmesan cheese to the dough and then sprinkle some on top of the rolls five minutes before they’re done baking.
Storage
- Fridge: Keep leftover rolls in an airtight container for up to one week. Reheat in a warm oven to refresh.
- Freezer (baked): Wrap cooled rolls tightly and freeze for up to 3 months. Thaw and reheat before serving.
- Dough storage: Unbaked dough can be refrigerated up to 1 week. Pinch off what you need each day and bake fresh rolls anytime.
Recipe FAQs
Can I make the dough in advance?
Yes! That’s the beauty of this recipe. The dough can be refrigerated up to a week, so you can bake fresh rolls when you need them.
Why do I need to punch down the dough?
Punching down redistributes the yeast and releases excess gas. It helps the rolls bake up light instead of dense.
Do I need a stand mixer for this recipe?
Not at all. A wooden spoon and your hands will do just fine. This dough is soft and forgiving.
Can I use butter instead of shortening?
Yes. Butter works, though the rolls will be a little richer and slightly denser. Shortening gives a fluffier texture.
Ingredients
- 1 cup boiling water
- 1 cup shortening
- 3 packets Rapid Rise Yeast I use Red Star
- 1 cup lukewarm water
- 2 eggs
- 6 cups all-purpose flour
- 1/2 cup sugar
- 1 teaspoon salt
Instructions
At least a day before you want the rolls
- In a bowl or 2-3 cup measuring cup, place the shortening and pour boiling water over. Stir until shortening is melted. Allow to cool slightly while you do the rest.1 cup boiling water, 1 cup shortening
- In a separate medium-sized bowl, stir the yeast and lukewarm water together until yeast is dissolved. Set aside.3 packets Rapid Rise Yeast, 1 cup lukewarm water
- Mix the eggs into the yeast mixture. Once the shortening has cooled a bit, pour that into the yeast mixture as well and stir well.2 eggs
- In a large bowl, stir together the flour, sugar, and salt. Add in the yeast mixture and stir until a dough is formed. Cover this and place it in the refrigerator. Before you go to bed, punch it down and punch it down again in the morning.6 cups all-purpose flour, 1/2 cup sugar, 1 teaspoon salt
Two hours before you want the rolls
- Remove the amount of dough you want to use and place it on a floured surface. Knead it just a few times (by pressing it into a ball and then flattening with the heel of your hand, then repeating two more times) and then pat it out to about 1/2-inch thick. Cut out the rolls with a small biscuit cutter or drinking glass. Place on greased baking sheet and cover, allowing to rise for two hours.
- Bake at 425 for 15 to 20 minutes.
Great tip on the Red Star Yeast. I’m going to make these rolls, as they sound delicious. I have your first cookbook and love your recipes.
I love the smell of baking bread! My mother made the best bread and buns in the world; her sister, my Aunt Helen, baked a lot of bread, too, and even though I know she wasn’t baking bread every time I went there, in my memory her house always smelled like fresh bread! I can’t wait to make these–my mouth is watering right now but since it’s 1:30 in the morning and I only have regular yeast and not rapid rise, I guess I’ll have to wait a day or two.
I agree Beverly, it is one of the best smells ever!
I’m not usually home 2 hours before I start cooking. Can these be cut and set out to rise in the morning before leaving for work, then cooked when arriving home? If I waited 2 hours after we got home to cook supper my family would starve and kill me. Thanks for your help they look yummy.
Hey Jennifer! The foolproof way to do this is to let them rise when you can, the full two hours, and then bake them fully. Allow them to cool and wrap well and reheat when you want them. If you set them out to rise at room temp they will rise and deflate over the course of that much time and if you let them rise in the fridge they will most likely not be where you need them to be by the time you get home. One process is way too fast and one way too slow :). What I would do if I were you is cut them out and all that jazz, put them on a greased tray, spray the tops with cooking spray in case they rise too much,cover them loosely with cling wrap or the like and put in the fridge for the day. When you come home they may need another hour-ish to rise once you take them out but that can be your call. I hope this doesn’t sound confusing as I was walking through possible scenarios while I typed 🙂 Baking fully and then reheating will be your best, no fail option though :). Have a great day!
Thank you so much. I will try them and let you know what worked.
Christy, I love all of your recipes that I have tried, and that’s quite a few. Jordan Rolls are to die for, but with this recipe am wondering – do you have to put them in the fridge, or can you just go ahead and bake them?
Thanks
You can but you’ll miss two of the risings so they won’t be as fluffy or flavorful (the flavor develops over time). I was going to recommend Jordan rolls but you’re already covered there! 😀 Thank you so much Janet!
I just got the post with the roll recipe today and decided to make the rolls right away. The dough came together easily and I kept out enough dough to make some rolls for tonight. They rose up nice and high but by the time I got the oven up to temperature, they had deflated to about half the size they were. It was my fault for not heating the oven sooner and getting them in to cook as soon as they had risen enough. I do have to say the flavor was sooooo good! My husband, who is a bread lover, really enjoyed them and commented on how good the flavor was. I still have about half the dough in the fridge and will make them again in the next couple of days to see if I can get them in the oven fast enough to keep their “loft”. Thanks for the great recipe, Christy. This is definitely a keeper!
Hey! First of all, I’m glad you enjoyed them! What you’re looking at in terms of them deflating is that you were actually cooking them on that first rise, which is fine, but the second (and third) is where you get the volume and more developed flavor – and there is no race to get the oven preheated because it is more stable. 🙂 That is why we punch down the dough in the refrigerator, to get it going on that second rise. When we shape them into rolls and let that rise, that is the third. I think you’ll see a big difference the next time you make them and love them even more! 🙂 Have a great day, LaFern!
How long wool the dough keep in the fridge? Also, do you think it would freeze well?
Thanks! 🙂
Oops! *will* not wool
Hey Kandice! I try to use my dough by week’s end, so about a week but it’s best not to stretch it out to the seventh day if you can help it :). I don’t generally freeze yeast dough as it can be a bit unpredictable, but the completed rolls freeze very well if wrapped up really good :).
Hi
I make yeast rolls a couple of times a week but I use lard in mine, that’s what my grandmother used.. can you use lard in these rolls instead of shortening?
Christy
These look wonderful. Want to make them in the morning–if I made them 6am or so in the morning–would it be in the fridge long enough to bake some tomorrow evening? Just too tired to mix it up this evening.
I made a batch of dough this afternoon and kept out enough to have rolls for dinner tonight. After making the dough I let it rise for an hour then punched it down and pinched off enough for tonight’s rolls. I cut those out and put them covered in a warm place to rise for another hour. I put the rest of the dough in the fridge for later. I would guess as long as the dough has enough time to warm up and rise, any amount of time between mixing it and cutting it out would be O.K. Right, Christy?
Yes. If you make them first thing in the morning, leave the dough sitting out for about half an hour (or so) before putting it in the fridge, then punch them down around lunch and you should be fine by supper. Have a great day, Sibyl!