
How To Make Kimchi At Home
Learn how to make kimchi at home with my easy homemade kimchi recipe. This traditional Korean side dish involves fermenting vegetables like cabbage, onion, and carrot in a spicy ginger, garlic, and red pepper sauce.
A Quick Look At The Recipe
- Recipe Name: Homemade Kimchi
- Ready In: 10085 minutes
- Serves: 4
- Main Ingredients: napa cabbage, green onion, carrots, onion, sea salt, minced garlic, minced ginger, dried chili flakes
- Why You'll Love It: Learn how to make kimchi at home with my easy homemade kimchi recipe. This traditional Korean side dish involves fermenting vegetables in a spicy sauce.
Anyone who has been reading my ramblings for a while probably knows that I became a huge fan of some Asian dishes about four years ago (see here and here). I fell in love with it after watching Korean dramas, as they just make Korean food look SO GOOD when they eat.
Sooner or later, I knew I would find myself wanting to try making my own easy . Dramas show families sitting happily on their living room floors making it, grocery stores sell it in glass jars, and Korean restaurants serve it. But learning how to make kimchi at home is fortunately about as easy as it gets and you have plenty of room for customization, so you know I had to show you how.
Now, you can use a fermenting pot (info at bottom of post), which I do nowadays if I am making a big batch. But it is absolutely possible to make a deliciously easy kimchi recipe using just a mason jar, which is what I am showing you today.
In case you didn’t know already, kimchi is a traditional Korean side dish of fermented vegetables. It is similar to sauerkraut in preparation but with different ingredients and it’s usually spicy. Not only is it delicious but it is also very good for you! Are you ready to give it a go and learn how to make kimchi at home?
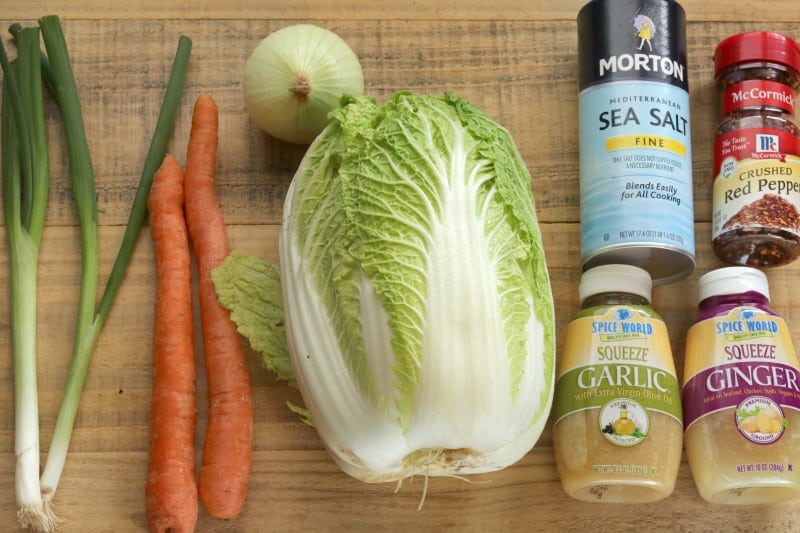
Recipe Ingredients
- Green onion
- Carrots
- White onion
- Napa cabbage
- Minced garlic
- Minced ginger
- Sea salt (or any non-iodized salt)
- Crushed red pepper flakes
How to Make Kimchi at Home in a Mason Jar

This is as simple as our sauerkraut recipe.
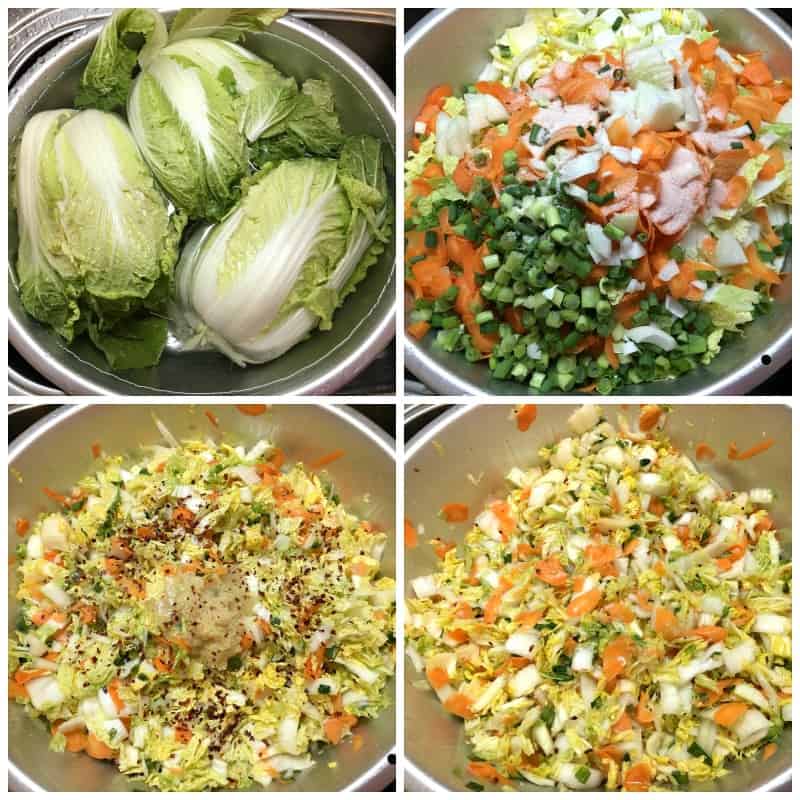
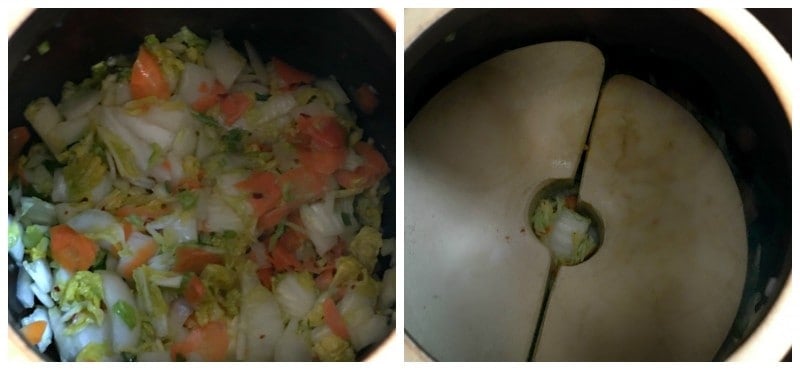
Just finely dice, chop, or shred all of your veggies (your preference) and place them in a large bowl.
Add all other ingredients.
Then, using gloved or really clean hands, commence squeezing and mixing it in the bowl for several minutes.
Not only does this mix it up well but it also helps draw the juices out. You want to have enough juice to cover your kimchi once you jar it, although it may take a day or two for that much juice to develop. Our point here is to give it a head start.
You want to really bruise your veggies, so squeeze, mix, squeeze, mix.
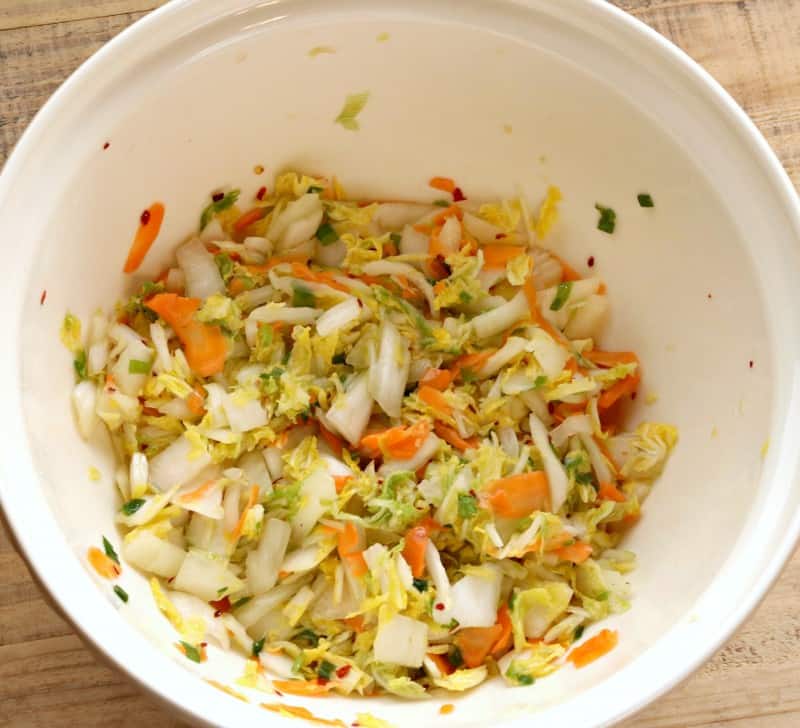
After a few minutes, it will look like this, significantly decreased in volume.
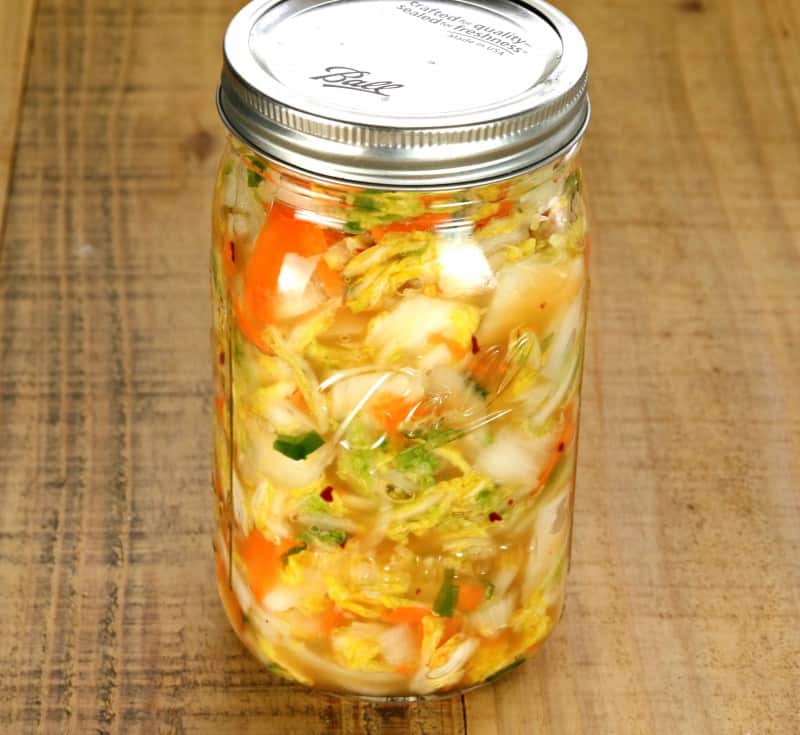
At this point, we want to pack it into a quart jar.
When I say “pack” I’m not kidding.
Really press it down in there. Once it is in, press it down some more. Then, put the lid on it. If you have some that won’t fit, put it in another jar.
Let this sit out on your counter for about a week and twice a day open and shut the lid to release pressure as the kimchi continues its .
If you forget for a day or two, it’s best to put the jar down in a plastic grocery sack and then open it, as there will likely be some spewing from pressure build-up, but your kimchi is just fine. Close the jar once the pressure is released, give it a quick rinse, and carry on.
How to Make Kimchi at Home in a Fermenting Pot
We follow the same steps, just make a bigger batch!
Then, I pack it all in my fermenting pot and add the weights before placing the lid on top.
The tops of these fermenting jars have a little moat around them that you fill with water. This prevents mold from getting in your kimchi and also allows gases to escape as the kimchi ferments. I just check the water in the moat every few days and open it up when it’s ready to be jarred.
Interested in a fermenting pot like I have? Here are two really good ones: Humble House Sauerkrock and Harvest Fiesta Fermentation Crock.
In about a week, enjoy your delicious kimchi! See, told you it was easy to learn how to make kimchi at home!
Storage
When stored in the fridge, kimchi lasts up to 3 months and will continue to ferment.
Recipe Notes
- Traditional kimchi includes red pepper powder (Korean red pepper flakes called gochugaru) and daikon radish (). Crushed red pepper flakes work just fine and I’ve only seen a daikon radish on the internet so I quickly decided that wasn’t a hill worth dying on for me. Also, go easy on the red pepper unless you just really love spicy stuff because it is going to get progressively stronger as the kimchi ripens and the spiciness will completely permeate the kimchi.
- For extra flavor, add 2 tablespoons of fish sauce (substitute for soy sauce for vegan kimchi) and 2 teaspoons of sugar to the kimchi brine.
Recipe FAQs
What do you eat kimchi with?
Well, it’s technically a side dish that goes perfectly with other like bulgogi, but for those who aren’t familiar, here are some Southern food ideas:
- In place of coleslaw or burger slaw at a BBQ. You can eat it as a side dish or as a sandwich/burger topping.
- As a little salad or appetizer.
- On the relish tray.
- On top of a hot dog.
- On top of scrambled eggs for breakfast.
- Alongside any Asian dish like my Asian-inspired pot roast or make kimchi fried rice.
- As part of a fish fry.
- Or you can eat it like I do: with a fork, by itself, whenever the mood strikes me!
What does kimchi taste like?
Kimchi has a complex flavor that can vary every time you make it. However, it’s typically a combination of salty, sour, and spicy.
How much kimchi does this recipe make?
Today I’m showing you how to make a small batch; about a quart jar’s worth. There might be enough to make a quart and a pint jar so just have an extra jar handy in case. As I mentioned, this is something you can customize to your own taste but I’m giving you how I do it as a starting point. Y’all can then take the ball and run with it.
What if there isn’t enough liquid?
There should be enough liquid to cover the kimchi by the next day. On the off chance that there isn’t, heat 2 cups of water to boiling, stir in 3/4 of a tablespoon of salt (remember, not iodized salt), and then allow to cool completely. You now have a brine and you can add as much of this as is needed to cover your kimchi (or whatever else you are fermenting, such as sauerkraut).
When is homemade kimchi ready to eat?
I find that kimchi is ready much sooner than sauerkraut is. Mine is generally good to go in about a week. At that point, I put it in jars and store it in my refrigerator, where it gets even better in another week or two (but I start eating it right away).
You can tell if your Kimchi is ripe by the taste and smell. You won’t be able to taste individual ingredients anymore, but rather it will all have a new, combined, full-bodied taste in every bite. If you’re using a fermenting pot, you’ll notice that the “burps” (little gas bubbles coming out through the water seal) become far more frequent and family members will complain about the smell!
Do I need special equipment to make kimchi in a jar?
You can certainly buy all sorts of accessories in order to make fermenting in glass jars more convenient, like fermenting pipes, glass weights, special lids, etc. But a simple glass jar with a human to open and shut it twice a day to release pressure is all that is needed.
Is kimchi good for you?
Yes, kimchi is good for you! Because we naturally ferment the kimchi, it’s overloaded with healthy bacteria, which is good for your gut and your immunity.
How do I make homemade kimchi more or less sour?
To make the kimchi sourer, leave it out of the fridge for longer. To make it less sour, place it in the fridge after leaving it out overnight.
You may also like these other pickles:

Ingredients
- 1 head napa cabbage
- 2 green onion
- 2 large carrots
- 1 medium onion
- 1 tablespoon sea salt can use kosher salt or pink salt, just not iodized
- 1 tablespoon minced garlic
- 1 tablespoon minced ginger
- 1/2 teaspoon dried chili flakes
Instructions
- Peel onion and carrot. Dice or slice all veggies (your preference) and place them in a large bowl.1 head napa cabbage, 2 green onion, 2 large carrots, 1 medium onion
- Add all other ingredients.1 tablespoon sea salt, 1 tablespoon minced garlic, 1 tablespoon minced ginger, 1/2 teaspoon dried chili flakes
- Using very clean or gloved hands, squeeze and mix ingredients repeatedly until they have reduced in volume by about half and are leeching liquid. Pack ingredients into a quart-size jar (or two jars if need be).
- Place in a cool and somewhat dark place (the kitchen counter is fine) and open and shut the lid twice a day to vent until kimchi is ready (about one week). See the post for tips and hints on making this and knowing when it is ripe.
- Once kimchi is ripened, store it in the refrigerator.
Nutrition
Here are some other Korean-inspired recipes from friends around the web:
- Korean Barbecue Chicken from a Dash of Sanity
- Korean BBQ Steak Rice Bowls from Foodie with Family
- Korean Glass Noodles from Barefoot in the Kitchen
- Slow Cooker Korean Short Ribs from Brown Eyed Baker
Note: My starting point for this recipe was found in Nourishing Traditions, a great cookbook with all sorts of wonderful information about eating the way our ancestors did. It’s a fascinating read and always a great resource.
I have made this but added some cut up fresh spinach for even more nutrition. This is the easiest and tastiest and cheapest way to make Kimchi, thank u so much for posting it.
You are so welcome Sherry. Glad you liked it!
I think there are good arguments from both sides here. I do believe responsive design should be a consideration on a case by case basis, depending on purpose and budget etc
. y only problem is with Tom’s view in user expectations. I don’t think a user expects a mobile version of a website to mimic the layout of the desktop version. What they expect is to be able to perform the same functions in a similar manner.
As long as I can do what I want on the mobile version and it’s as easy to do as in the desktop version, I’ll be happy. And responsive design is one really good way to do that.
For example, I’m reading this article on my iPhone, I could read it fine without any dramas ( double tap the column of text to fit it to the screen), but leaving this comment was a bit of a pain. You don’t have to go gung-go and make a super responsive design for every project, but just have a quick think about how it functions across different devices and if you could use responsive techniques ( or something else maybe ) to help your users do what they want on your site. This site would be greatly improved with a
Mobile friendly comment form, but I don’t think a fully responsive overhaul is necessary. I’m sure a lot of your traffic would come from mobile devices, donut would make sense to allow a tiny but extra for that. Having said all of that I do agree with Tom that responsive is definitely not necessary on every job and I’m sick of articles trying to push it as the only way to do things. Responsive design is awesome, but like any web technology lets use it wisely so it doesn’t start to suck! *cough* flash *cough*.
I like your thoughts, on your time here! I agree with just about everything you said about Korea…it is definitely not a cheap country compared to other places in Asia, that is for sure! Since I have been living here for about 6 weeks now, I have discovered the cheap places to eat in my neighborhood. Kim bap places are the way to go…two of us eat well for $10, it is awesome!
Christy, I made your kimchi a week ago and had my first taste a while ago. It is delicious!!! Fits my taste exactly!!! Thankyou
So wonderful to hear! Thanks for letting us know 🙂